

TL;DR: I upgraded part of my Wi-Fi network on my farm with Unify equipment after years of “making do”.
Let me Explain the Setting
Roughly 5 years ago I moved, with my family, to a farm in rural Victoria, a state in the South of Australia.
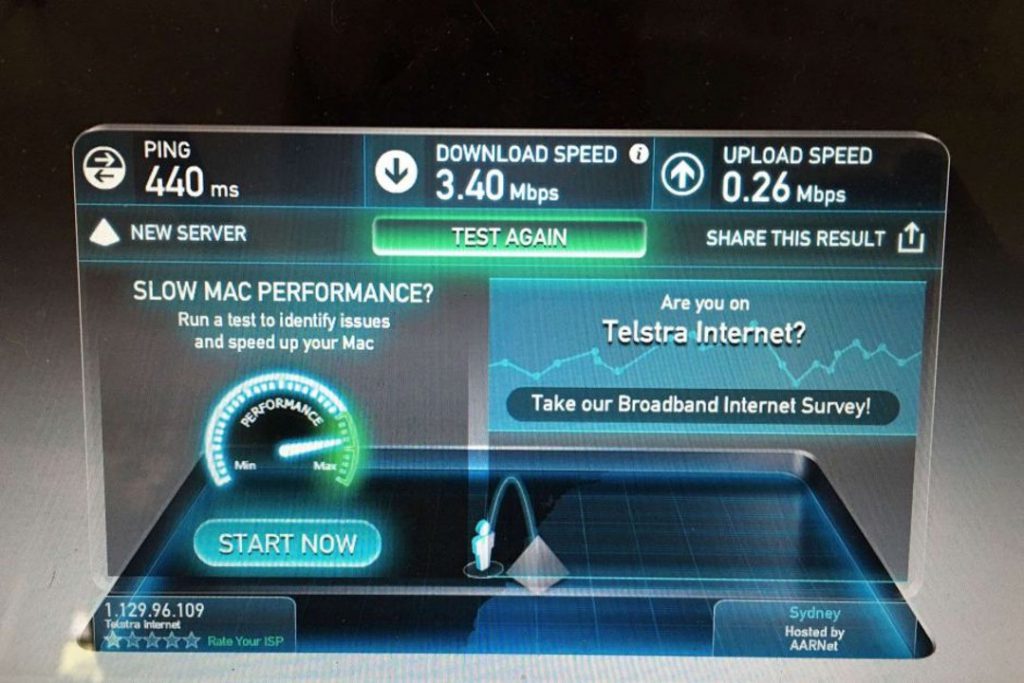
While it is beautiful and we absolutely love living here, there are technical challenges. Australia is not known for amazing internet connections and speeds. In fact, we are number 50 on the list of global internet speeds beaten by Kenya, Luxemburg, Qatar and a lot more (46 others actually). If you then move to the middle of nowhere in Australia, you are asking for a world of Internet pain. And of course I work from home in technology and recording lots of videos. We are too far from the phone exchange to get even an ADSL connection, there is no fiber (that is something you eat in these parts), and there is no mobile connection. When we moved in we took over a satellite internet connection which tested as follows.
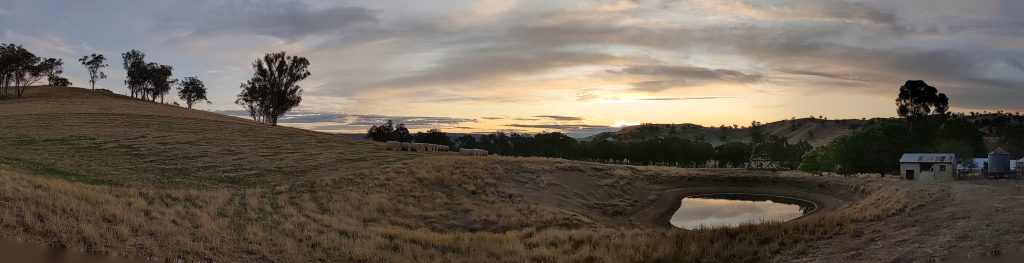
I figured out that I could get a mobile connection on top of the hill in the back paddock, which I used to download large files in the first 6 weeks we lived there. I drove my Jeep up the top of the hill, tethered my laptop to my phone, then sucked up all the large files I could, then drove back down. Welcome to the 21st century. Not only was the internet service abysmal, but we also have 3 buildings and 3 acres of garden around the house to cover in WiFi. And it is all on a hill. The challenge was on.
The Patchwork Solution
I have made my mind up from the start that we wouldn’t have a fixed line phone. Archaic technology that I couldn’t even use for any data connections. Instead we installed an approved Telstra repeater and made up a 3G connection that works inside the house. While this isn’t ideal, as you have to be in a certain part of the house to get connection, it is better than nothing.
I then used some cheap Next-G router to both provide the abysmal satellite connection via WiFi, as well as a backup 3G sim card to give a slightly less abysmal mobile connection. A further two WiFi repeaters were added to the setup to provide slightly better range around the house, the workshop and the second resident. We lived with this system for about 15 months. One WiFi access point and a bunch of repeaters. The bed & breakfast never got coverage.
After 15 months we got a new satellite connection called SkyMuster. Straight out of James Bond. Speeds went to 25Mb/5Mb and a lot more data. Yeah, we don’t have unlimited data either, so it gets rationed. No Netflix, no YoutTube in 4K or HD, and an increased obsession about minimising data usage. I upgraded to a high-end ASUS router, which increased stability and management options. Still stuck with repeater networks. I used this network setup for another 3.5 years. Until now.
The Teenager Problem
I would expect other families are dealing with teenagers on their network too. I do believe I have slightly different criteria for allowing a teenager on my network than most others. The main issue is that our satellite connection currently allows 200GB of peak data usage (7am-1am) and 100 GB of off peak usage (1am-7am). When there are two people working from home, plus all the usual usage, this isn’t a lot. In fact, as one of my colleagues said, “that is like two nights on Netflix”. Exactly. My 14-year old will happily use 2GB per hour all day every day.
On top of that he is extremely computer savvy, and knows his way around a network. And I mean “around”. He can change MAC address on devices, bypass LAN connections, magically conjure up a new phone, and in general find a way. I want him to use the network, but on my terms. I need it for work. No work, no place to stay.
Criteria
Obviously there were certain criteria I wanted to fulfill with setting up a whole new network. In no particular order they were:
- A mesh network with a single SSID (WiFi name) across the entire property.
- A way to create a second logically separate network.
- The ability to limit certain connections and networks by time, data usage and speed (the data usage limit has been tricky with the patchwork solution).
- A way to extend the mesh network easily.
- Being able to extend the network with non-LAN devices (we have a large area to cover).
- Remote monitoring, management and configuration of the whole network.
- High quality hardware that can be upgraded easily. I don’t want to redo this whole exercise in 5 years.
Approach
I am not a networking person. I don’t know much about LAN, WAN, Access Points, Switches, Routers etc. You set it up and then forget about it.
Having had a plethora of various devices and brands to try and create a solution, I was keen to get a pro-sumer level solution. Many friends both within the IT industry and outside of it have gone with Ubiquiti hardware, especially Unifi. I briefly considered other solutions and brands, but the extensiblity and ease of use, combined with good hardware reviews made the choice relatively simple.
And here is the conundrum. When you get a standard consumer level WiFi solution, you generally get a single unit that contains a modem/router, a DHCP server, firewall, WiFi access point and a lot more. It is an easy thing to buy and set up for most people, myself included. However, you limit the extensibilty and versatility of the solution. You can’t just change a single component. With Unifi, everything is separate. You get each component of the network as a standalone hardware unit. And that is great. But I had absolutely no idea where to start and what to get.
In other words, I could not have my cake and eat it too. I couldn’t buy a single box with everything I needed. I had to do learning and do research. Bugger!
Solution (version 1)
After maybe 4 months of reading, buying knowledgeable friends dinner, budgeting, researching various Unifi products and going back and forth on what to buy and how to configure everything, I finally settled on an initial setup.
I got a second hand 1st gen Cloud Key and 24-port Unifi Switch, as well as two Long Range Access Points. This appeared to be the minimum starting point I could get away with. A couple of questions you might have
- Why a 24-port switch? Two reasons: As stated above I like to future proof this somehow, and I have plans for expansion. Secondly, I got a great deal on a second hand unit.
- You have no modem/routing, nor security for external traffic? I reused my current ASUS unit for this purpose to both save on cost and to test the setup before investing further.
According to the specification on the AP-LR units, the range is “up to 180 meters”, which of course never means you get that range. Even if I got half that would work too. Trees, walls, hills and more will affect that range.
Upgrade commencing. Oh that sweet sweet quality network flavour. 🥰 pic.twitter.com/ambfyGG3FQ
— Lars Klint 🌳🐏🚜 (@larsklint) March 5, 2020
At first I got help setting up the network in my company office. This caused a bunch of weird behaviour, probably because the policies on the network went “hang on a minute there”. I did clear it with our IT team, but it just wouldn’t play nice. Long story short, I took it all home and set it up there.
Controller Software
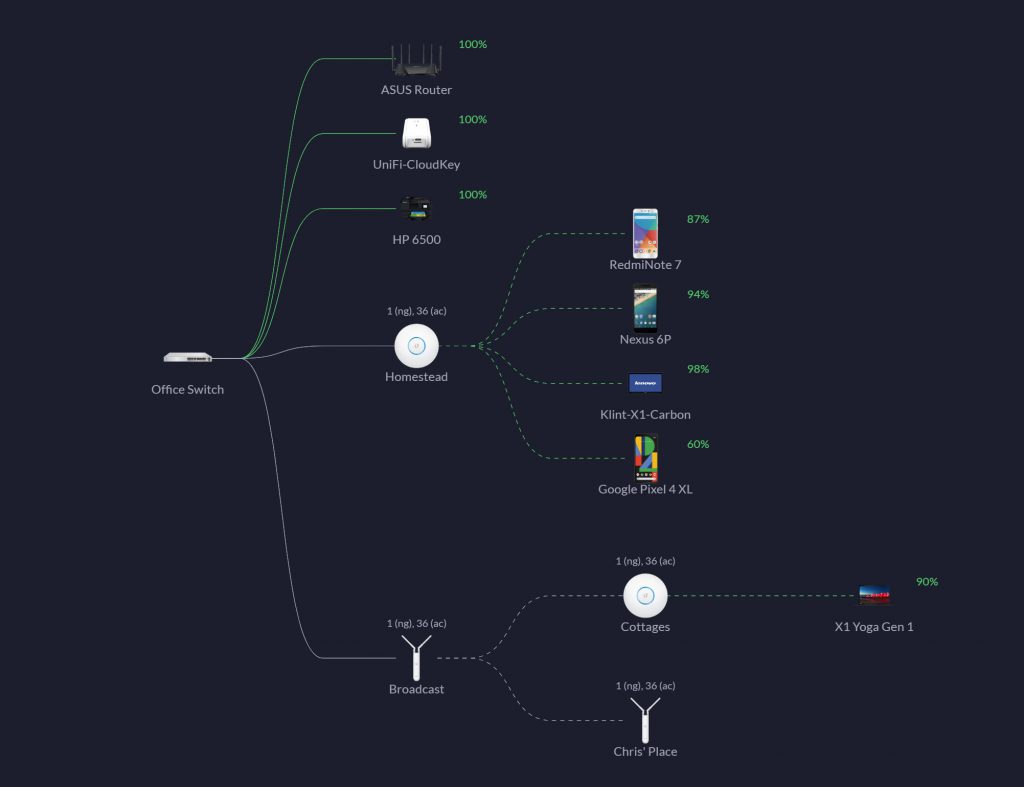
Setting up the Unifi components require some sequence of steps, the first being setting up the controller software. This can be hosted on a machine of your choosing, or, as I did, you can get a Cloud Key, which is a hardware unit that allows remote access and has the controller software.
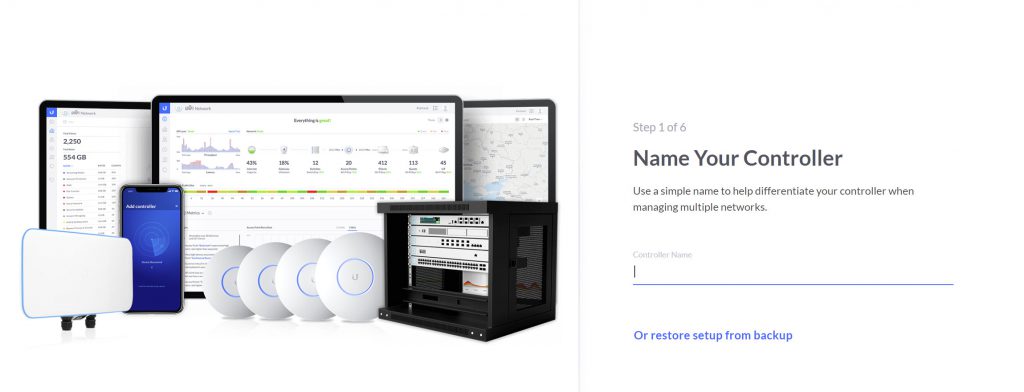
You connect the Cloud Key to your network. I did this via my 24-port Unifi Switch. You then connect to the IP address of the controller in a browser and follow the steps. Once you have set it up with a name, create a Unifi account, whether you want remote access and so on. You should then see something like this.
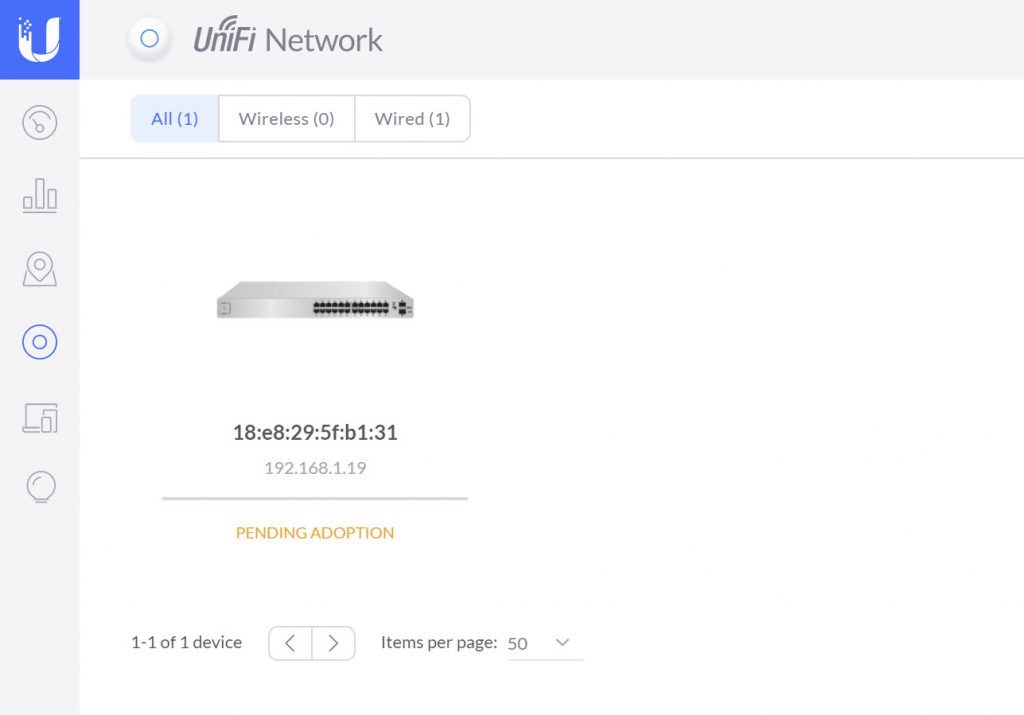
Device Adoption
As you can tell from the screenshot above, the Switch is pending adoption. That is the term used to use a device on your network. You adopt it. All you do is click the “adopt” button in the controller software for the device, and Unifi does the rest. Once the device is adopted, it will be part of the network, and you can manage it from the controller as well. Easy peacy.
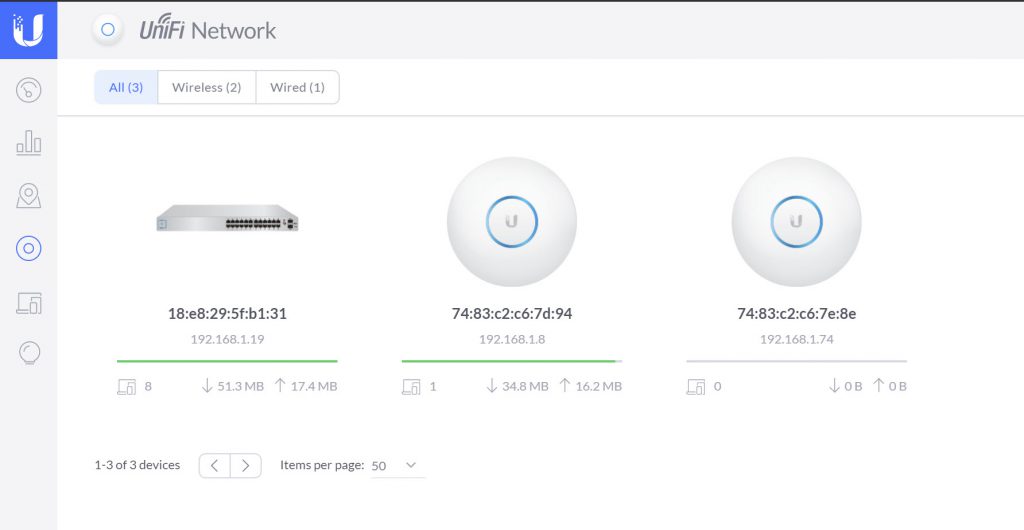
Once I had adopted the switch and the two UAC-AP-LR units, it all showed up in the controller portal.
Access Point Placement
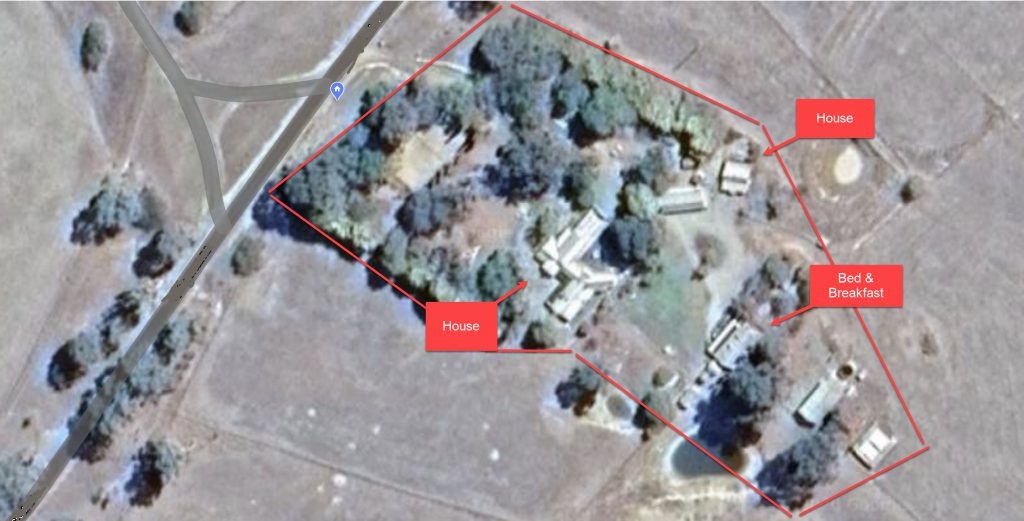
To show what a noob I am when it comes to networking, I had no idea how to install the APs for best performance. The instructions for the UAP-AC-LR shows that you can mount the unit either horizontally (on the ceiling) or vertically (on the wall). I had a great spot on the wall for one in the main house, and I was going to place the second one in the B&B cottages (refer to earlier map). As the crow flies, that is roughly 50 meters apart. With an optimal range of 180 meters, that should be plenty. It wasn’t.
I could not get the two APs to connect at all. I had plugged on into the Switch and the other connecting wirelessly. Turned out that the units don’t work well mounted vertically because of the antenna radiation profile. And it also turns out that metal roofs, house walls and trees block the signal really well. Perfectly, in fact. Sigh.
I ended up installing one AP at the very top of the ceiling (about 3.5m up) in the part of the house closest to the cottages and the second AP outside under the verandah roof of the B&B cottages. Yes, I realise it isn’t meant for outside, but meh. That gave me some signal in the cottages (which is also where my office is). Oh, and I found the “dark theme” in the controller 😎
TL;DR Mount the access points as high up as possible (the range is like an umbrella-ish) and horizontally.
Yeah, but … coverage?
I started with getting the two UAC-AP-LR units, but deep inside my soul I knew that wouldn’t be enough. And it wasn’t. I had great coverage inside the main house and okay coverage for the B&B, but the second house as well as most of the immediate property didn’t have any at all. The solution was to get two Outdoor Mesh APs. They have the same range as the AP-LR units, but are specifically designed for being outside.
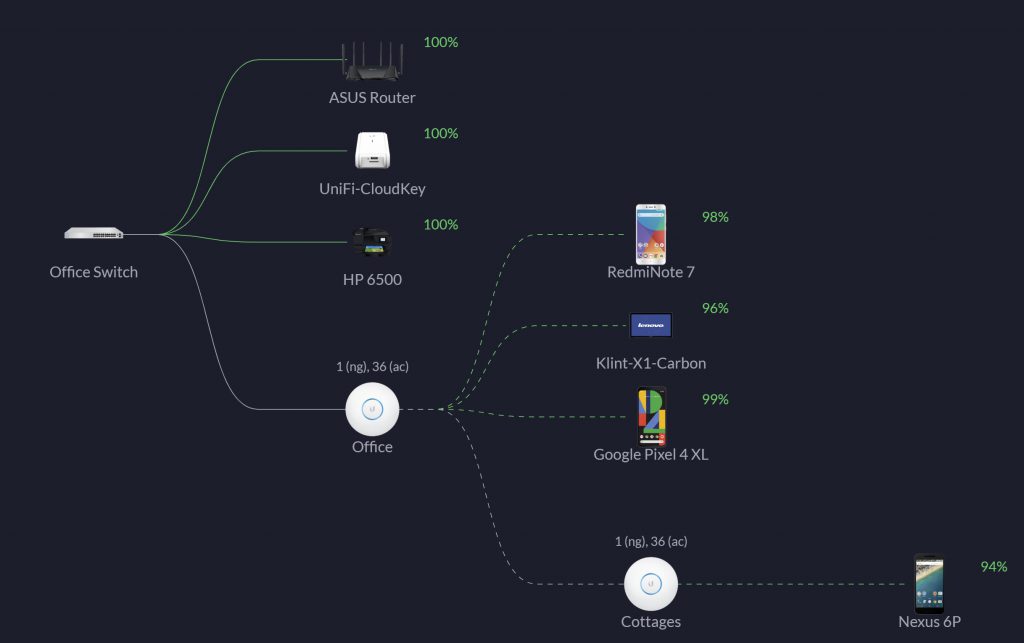
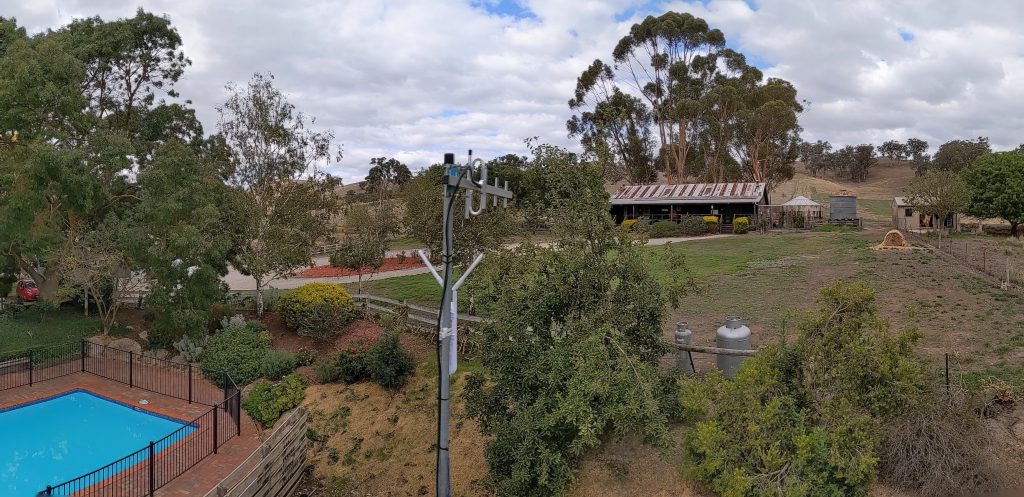
I placed one Outdoor Mesh AP on a “hockey stick” (see below), which was already there for my mobile signal (I did say I live remote), and this could then cover the majority of the space between all the buildings. This AP I connected with a Cat6 cable directly to the switch to make sure it has optimal signal and oomph (technical term).
The second Outdoor Mesh AP I put on the second house, and then wirelessly uplinking (connecting) to the first Outdoor Mesh AP. Which finally gave me great coverage to the majority of the buildings and area between them.
And the Unifi controller software also comes with a handy mapping feature that lets you place all the devices on a Google map (or image), which gives a good sense of coverage. It doesn’t take buildings or other structures into account though, and in fact my actual coverage is about 40% greater than what is shown.
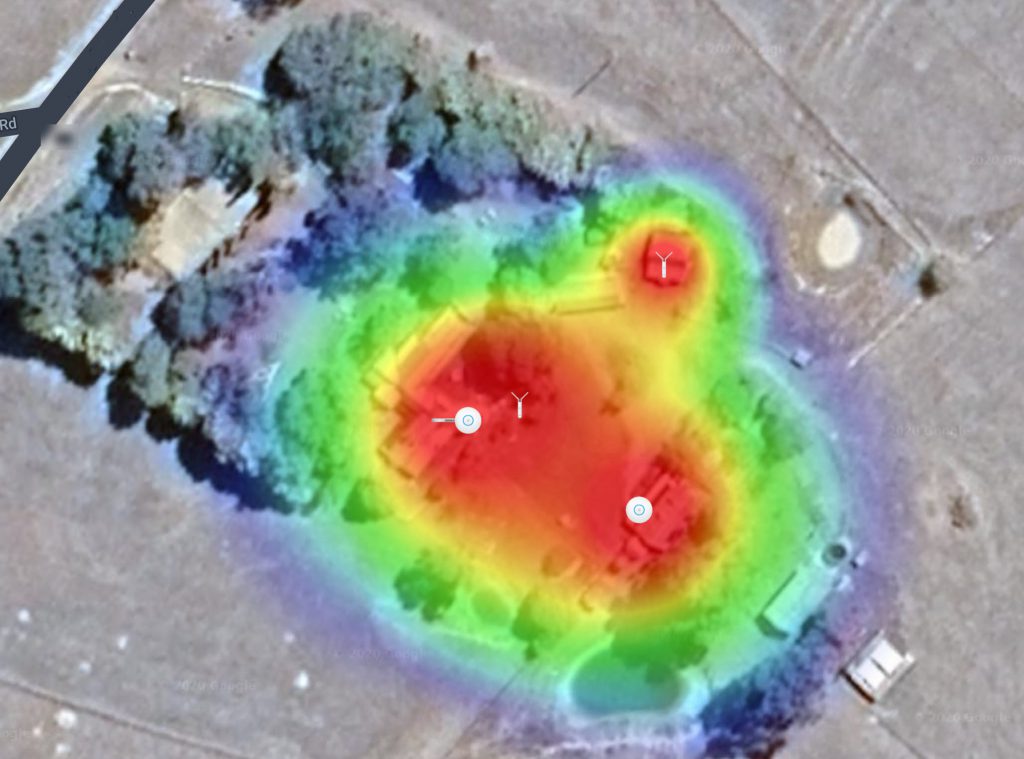
When testing just how far I could get the signal to stretch I walked up the hill. The claimed/nominated range for a UAC-AP-M is 180 meters. I got ~175 meters. I did not expect that.

Issues
It didn’t all go without hiccups. I have already described how trying to set up a personal network by using a corporate network was a silly idea. But there were a couple of other things I could have done better, or would have liked to avoid.
- I had to reset the APs a couple of times, because they got caught up in a provisioning loop it seemed.
- Understand how the signal of an access point works. Mounting them in the right location and horizontally has a big impact on your overall WiFi quality.
- If you provision an AP over LAN (connected), you can’t then use it wirelessly. I had to reset the AP-LR to get it to uplink over WiFi.
- You will always need more equipment than you think.
- I can’t create a second WiFi network on a second virtual LAN (VLAN). Whenever I try it, the connection to the Internet completely dies. 🤷♂️
In general the equipment works extremely well and most issues came from me not understanding how it all works. I learnt a ton.
Version 2 (and 3)
While I have very decent WiFi now, I can monitor it remotely and I have coverage on a large part of the property, I am by no means done. The most obvious missing piece is the Unifi Security Gateway. This is the DHCP server, firewall, traffic manager and much more. I am currently using my ASUS router for this purpose, which works just fine, but I am missing a whole bunch of features and functionality.
I will get another Outdoor Mesh AP to put on the outside of the B&B instead of the current AP-Lr (which is for indoor use) and then move the AP-LR to another part of the main house. This will also give me coverage over the tennis court and all the way to the gate (80 meters). Because I have a 24-port switch, I will also install wall-mounted RJ45 plugs for TVs and other devices.
Further down the line, I am installing cameras at the gate, house and garages. This is something I’d want to do both for insurance purposes and security. Unifi have their own range of cameras for this. I will also get one or two more Outdoor Mesh units to cover the rest of the sheds and immediate property. This will be used for IoT systems for garden watering, automatically turning on our bore pump for filling the bore tank, if the tank is low, and other projects.
Final Words
Wow, this post turned out a lot longer than I anticipated, but I had a lot of fun with it. Despite a few niggly bits and me not understanding everything to do with networks, WiFi and radio signals, I am extremely happy with the setup. The first version I have created is a base for many future projects that I can do one bit at the time. Unifi has a large range of products, and while I don’t know half of them, I am confident they can solve most of the network hurdles I come across. The only thing I regret is not doing it sooner to be honest.