

TL;DR; I made a Unifi camera work at my gate using solar power and long range WiFi. Also read my initial setup, and expansion with UDM-PRO and cameras to get the background.
First version of my solar powered @ubnt gate camera project. Outdoor rated cables and some tidy up still to be done. Write-up coming soon. 📡☀️ pic.twitter.com/lUc3fMf8WY
— Lars Klint 🌳🐏🚜 (@larsklint) June 2, 2020
Okay, I know. This networking exercise of my farm in country Australia has gone a bit further than I had planned, expected and anticipated. However, I am having a ton of fun with it, learning about active and passive PoE, NAS type hard drives, antenna radio patterns and so much more. It kinda blows my mind 🤯 how much there is to it. Soooo, why not add some complexity to the whole thing and add a camera at my gate. Where there is no power. Or network.
The Challenge
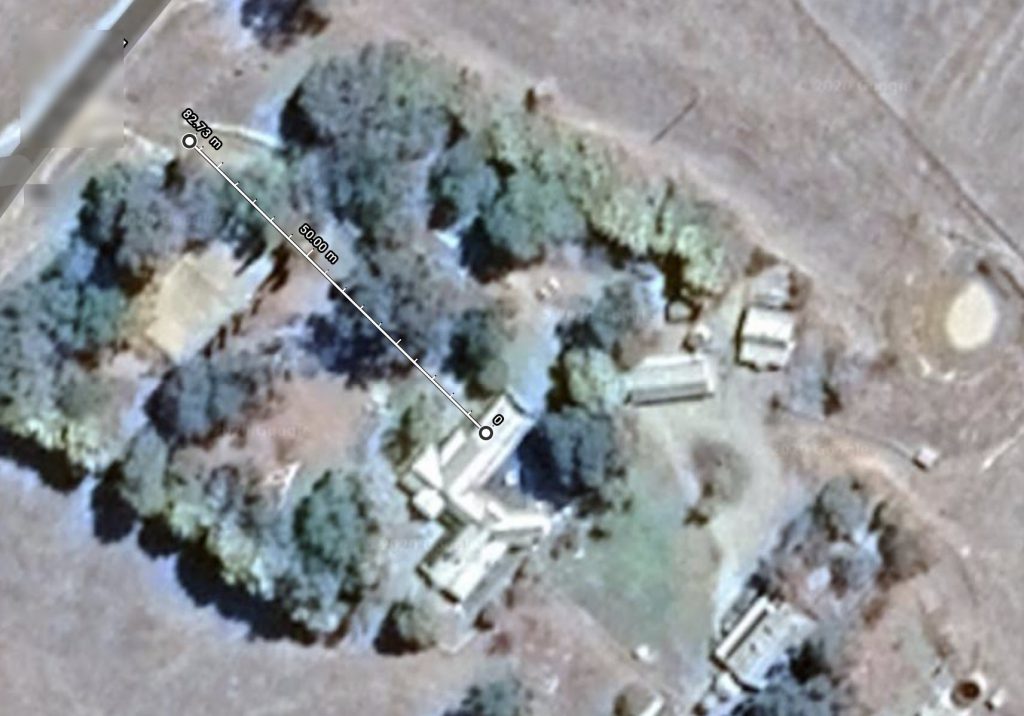
As I have mentioned several times before, I live on a farm in the middle of nowhere. Still, from time to time random cars drive up our driveway, turn around and drive out again. Kinda weird. I want a camera at the gate that can record these vehicles, and further down the track it will also be the camera for the gate intercom (yet to come). The challenge is that there is no power at all in that location. The closest powerpoint is about 80 meters away. Extension cord? 🤔
Investigating Solar Power
I know nothing about solar power. Zilch. Nada. Ingenting. I started figuring out how big a panel I might need, as all the solar panels I could find on eBay and other trading sites were 12V output. This meant I needed enough Watts through 12V to power a camera and some sort of connection.
Let’s say they use 3 Watts each, and that I can charge the batteries to power them for 6 hours a day. This being Australia, I’ll probably get more than that, but let’s be conservative.
That is 3 Watts times 2 times 24 hours (= 144 Watt-hours), which needs to be collected in less than 6 hours. 144 Watt hours divided by 6 hours is 24 Watts. Most photovoltaic panels get 15-20% efficiency. I ended up getting a 100W solar panel, which both fit my budget and physical size. I also got a pole mounted frame to fit the panel to a metal pole. Solar panel done.
Edit: I have since learnt that this is not how to calculate solar panel efficiency and size. A 100 watt panel produces 100 watt. The efficiency is relating to the individual cells that make up the panel. A 20% efficient panel is half the size of a 10% for the same wattage output. I learn all the time.
At this point I realise that power collected and massaged need to flow into a battery. 12V power means 12V battery, right? It does, but you need a solar controller. This is a device that manages charging the battery bank, prevent it from overcharging and many control the rate of the current and voltage at which it charges. In other words, it is an essential piece of equipment. Watching a video from Chris at Crosstalk Solutions, I bought the same controller he used. Also in that video was a now out-of-production Unifi device to connect the controller to a LAN cable.
Status at this point: I have solar panel, metal post and mount sorted. A solar controller will allow me to charge my battery, but how the heck do I get the juice into the delicious Unifi camera?
Consulting the Experts
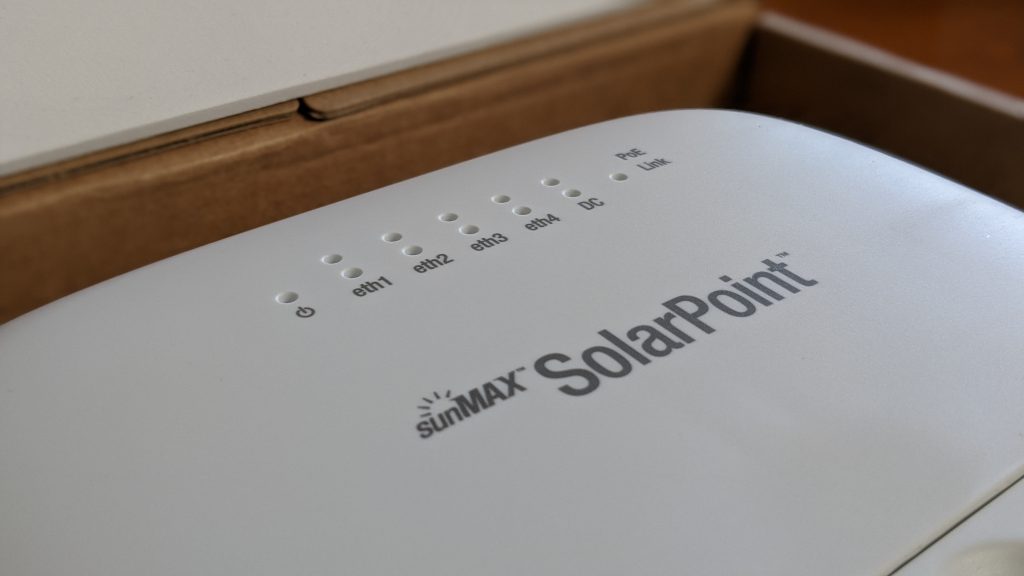
At this point I know a tiny bit about solar, but I need help getting the juice into the gear. I talk to Ubiquiti about how this can work and if they have the widgetydoo that can make it happen (the one that is out of production). Turns out they can do one better. Ubiquiti makes a solar controller. Yeah, really. It is called the SunMAX SolarPoint and is not only a solar controller, but also a 4-port passive PoE switch and weather station. It delivers a maximum of 40 Watts output and can handle 10-60v input from the panels. Perfect!
The lovely people at Ubiquiti also solved my connection issue (I’d like to connect the camera to my main farm WiFi) by using a pair of NanoStation AC 5. I alluded to this in my previous post, and this is indeed the way to go to have stable super fast long range wireless connection on you existing network. And they are properly long range. Up to about 15km range. I need 80 meters 🤷♂️.
Again, Ubiquiti sees value in me testing out these scenarios on my farm, as they aren’t your typical suburban setups and requires some thought into how it all can be hooked up to work in the best way. And because of this, they send me some of the gear to set up, review and figure out how a noob like me can get it to work. It’s a win-win. And you get to see it all too.
Test Rig
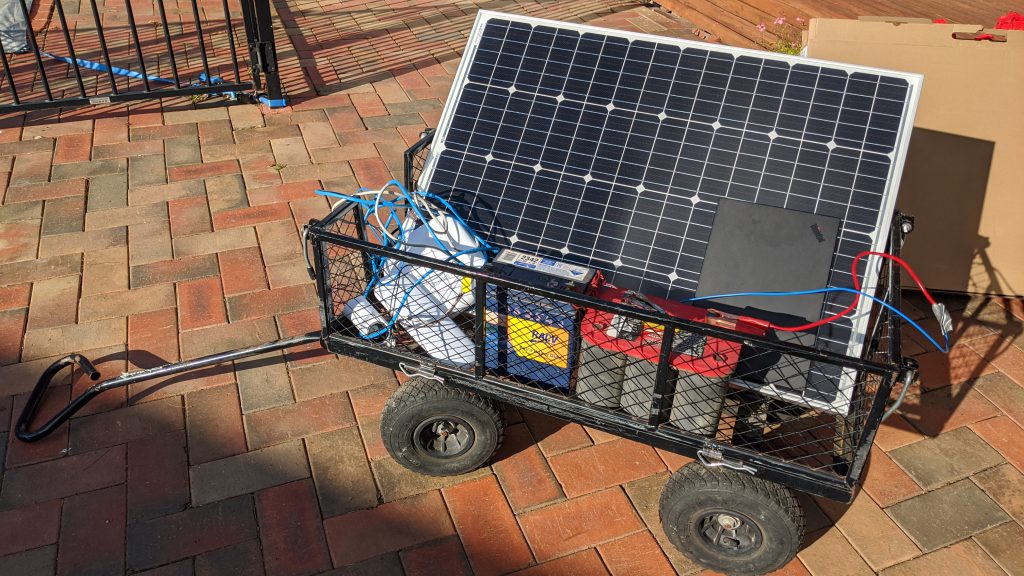
At this point I am not entirely sure all of this will work together. Solar panel, batteries, solar controller, NanoStation connection, G3 Pro camera, weather, trees, dogs…. there’s a lot to get to play nice together. Before everything is mounted to the pole 100 meters down the driveway, I thought I’d test it all out. Mobile style. Connect everything and get it working, then put it into a trolley in order to pull it around the garden and test the signal.
The Network Setup
The setup I am testing and going with looks like this. Well, not exactly, as this is a drawing, but conceptually it is similar.
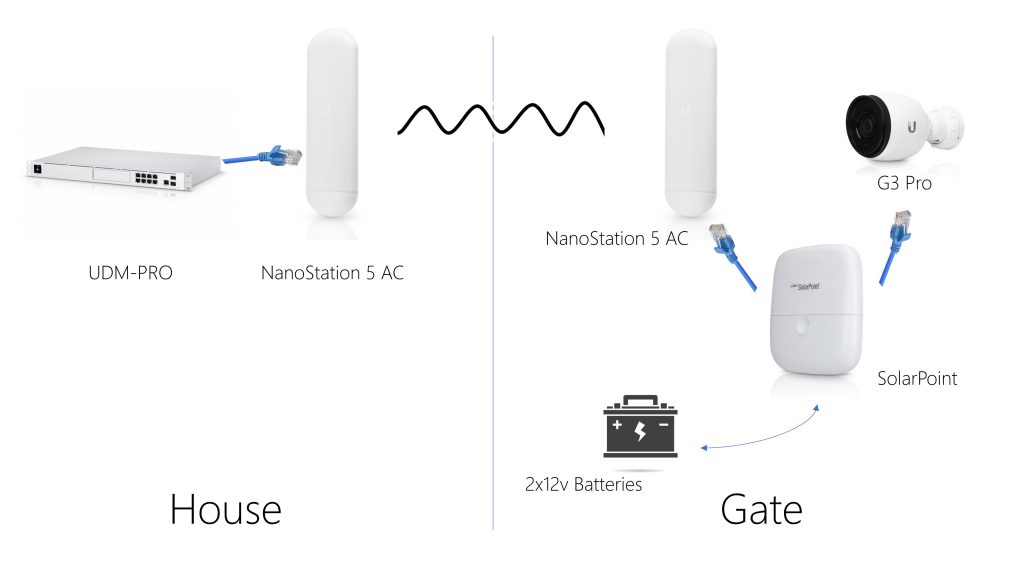
It isn’t a complicated part of the network. The critical part of the setup is the two NanoStations that needs to bridge the network from the house to the gate. The SolarPoint controller is providing power from the battery to the devices that are connected to it, such as the NanoStation at the gate.
NanoStation Configuration
Ubiquiti have different product lines, which you need to understand.
- The most known in the consumer space is Unifi, which is the access points, switches, security gateways and other core network components. Unifi is mainly aimed at local networks.
- There Ubiquiti Network Management System, or just UNMS, which is your more professional level gear aimed at telcos, long range WiFi needs and large scale networks. The NanoStation falls in this category.
- Protect is everything to do with video security, such as cameras and the Dream Machine Pro.
- Other product lines are Access and Talk, but they are not released in full yet (June 2020).
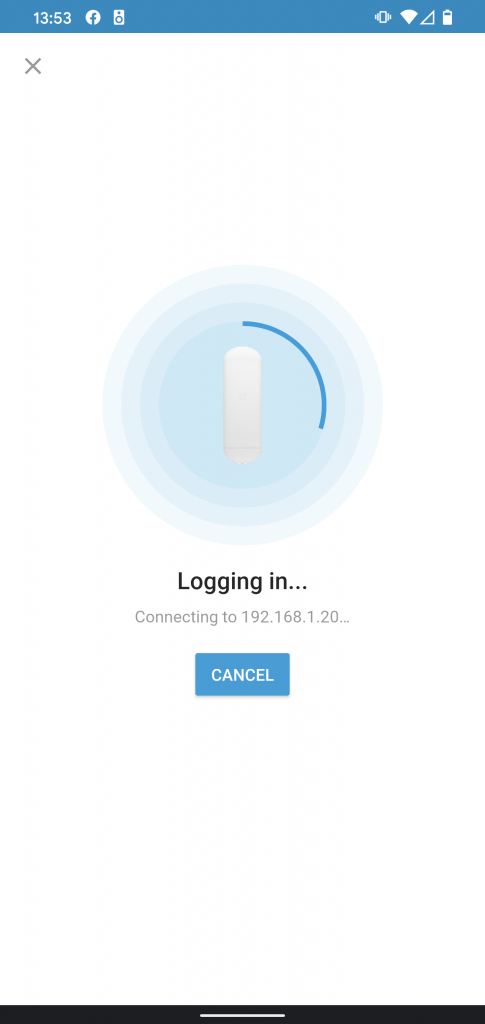
To set up a NanoStation, you’ll need your Android phone or iPhone.
- Install the UNMS app first.
- Turn on the NanoStation by plugging in a network cable via a RJ45 plug. This will turn on a management WiFi connection directly to the unit. The UNMS app will see this connection and prompt you to connect. Once you connect, the app sets up the NanoStation for you. It is really that simple.
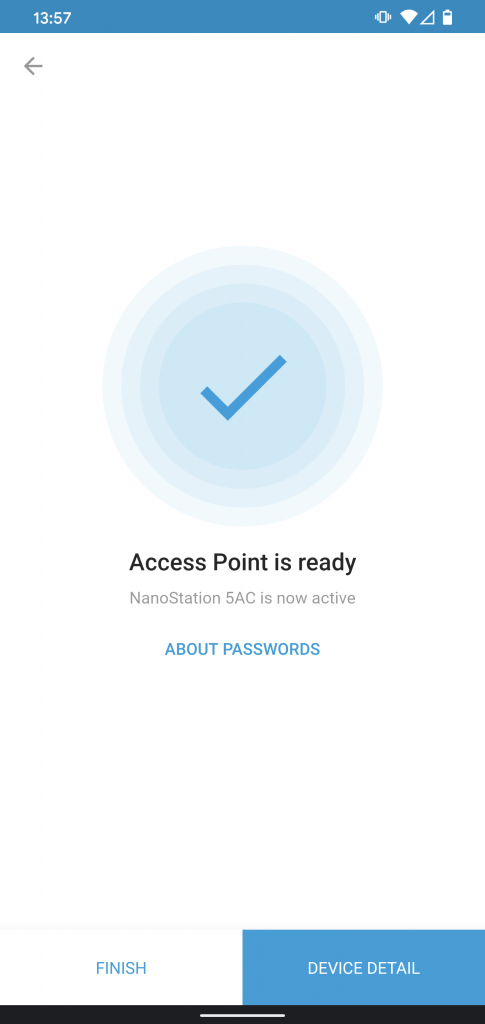
- At this point click the “About Passwords” and take a screenshot or write down the password being set up for management access to the NanoStation.
- In the UNMS app, go to the NanoStation you just set up and find the settings for it.
- There are several connection profiles you can choose. In my setup I am using Point-to-Point (PtP), which is a single device talking to another single device. You can also set up point to multipoint (PtMP) connections. You will also see either Station PtP or Access Point PtP. The Access Point is where the connection is coming from. In this case my house. The station is the receiving end. In this case my gate.
You follow the same procedure for the second NanoStation, but there are gotchas. Make sure that
- Both/all NanoStations are using the same SSID and password. If they don’t, they will not connect. Took me forever to figure that out.
- Make sure you copy the username and password during setup. If you don’t, you have to reset it through the app.
- Once the device is configured using the app and you have the username and password, make a note of the local IP (default is 192.168.1.20) and log in from a browser. It is a much better experience.
Once you have two NanoStations set up (one being an AP and one a station), they will just magically find each other.
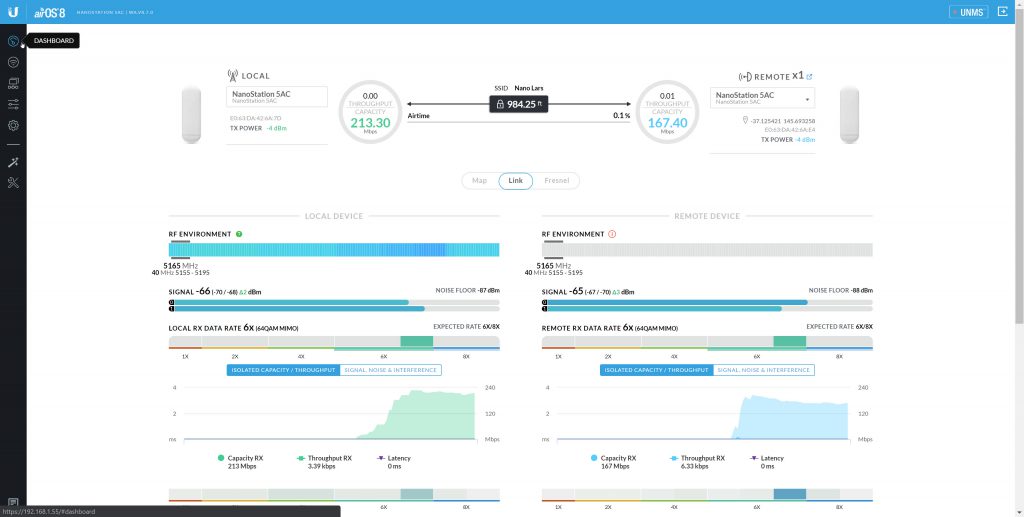
The dashboard is visually delicious with graphs moving in real time, your connection speed showing, the signal strength and bunch more. I don’t understand most of it, other than if you have two stations showing with a Mbps number, then you have connection between the two. I wasn’t sure how accurate I had to be in pointing each device at each other. Turns out: not very. It may have to do with them being so close to each other (~80 meters), but I had no trouble getting a good signal.
If you add the GPS location to each device, as well as the height from the ground it is mounted, you can get the Fresnel zones as well. This shows the range of signal travel, from a straight line between the two devices, and can indicate if you have any obstructions that could influence the signal. It still blows my mind, how accurately it can show this data.
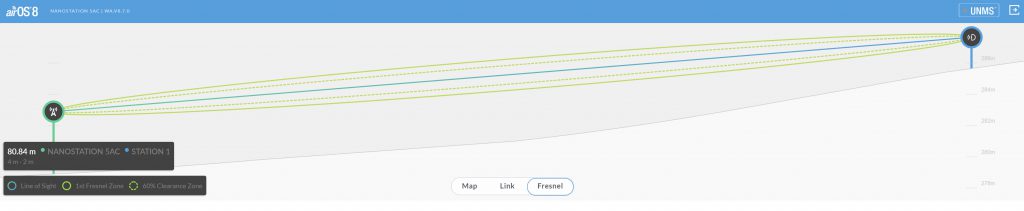
I wasn’t sure either, if the station side of the connection would be on its own network, or if it would be part of my existing local network. I couldn’t quite get that clear in my head. It is part of your local network. It is the same effect as running a CAT6 cable along the ground to another device, and the Unifi controller software knows this and just picks it up as a local device. Neat.
The SunMAX SolarPoint
Back to the SolarPoint. As I mentioned before, this is a kind of all-in-one device. It has the solar controller that regulates charging from the solar panel to the batteries, a 4 port 24v passive PoE switch and a 24v DC output. This removes a few problems, mainly how to get the power from the batteries into my Unifi and UNMS devices. Bear in mind, it is 24 passive PoE, so your device has to be able to run off this. For example, a Flex HD access point won’t work plugged into the SolarPoint. That needs 802.3af PoE. Yeah, standards.
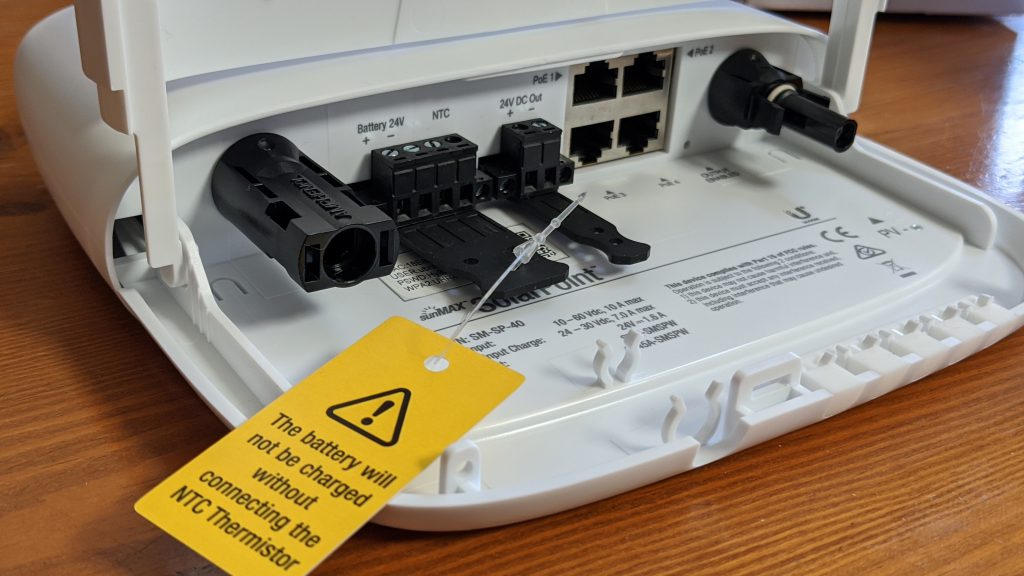
You will also need to have 24V batteries to charge, which threw me off. Where do I get a 24V battery? Ah, serialising voltage is like adding voltage up. Putting two 12V batteries in serial connection makes it a 24V battery. The SolarPoint also comes with an NTC connector. This is a Negative Temperature Coefficient Sensor, which regulates the voltage based on the environment temperature. Or something. All I know is that if it isn’t connected, the SolarPoint goes “nah, I am not turning on”. Speaking of connection, plugging in the NTC and the battery cables is super easy, as you can take the whole connection plug out, connect the wires, then plug it back in. Be aware that the management WiFi connection details are under that plug though.
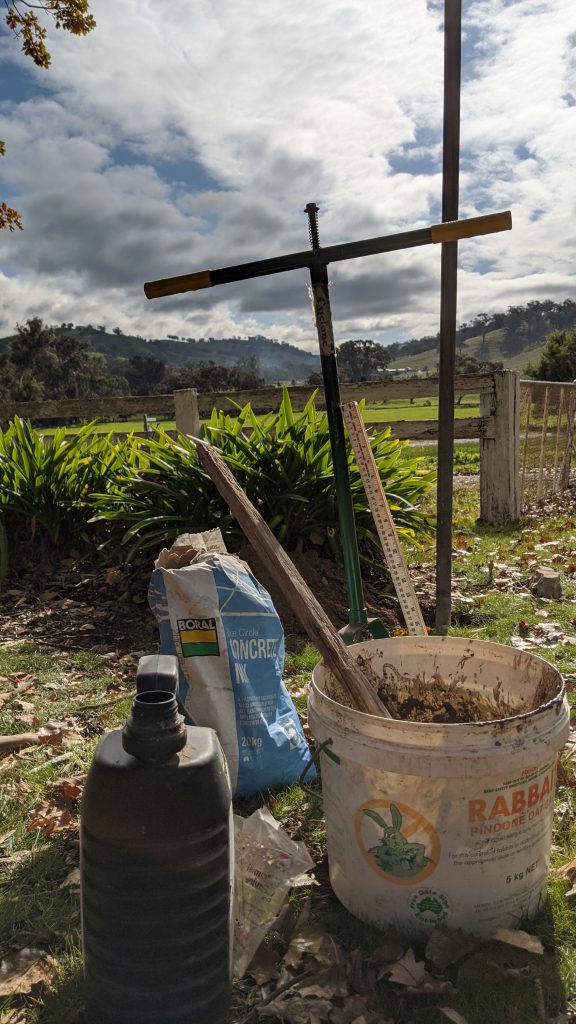
I connected it all up, as per my test rig, but mounted it on a pole (which I repurposed from an ancient aerial antenna setup). First version doesn’t have neither outdoor rated cables, nor surge protectors, but that is an easy upgrade.
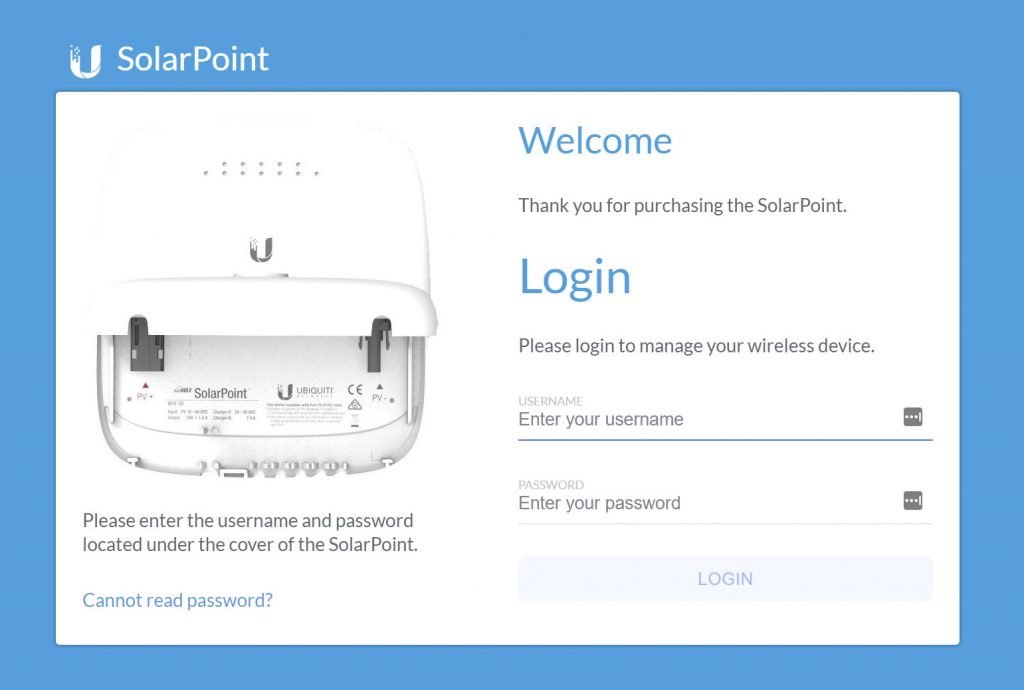
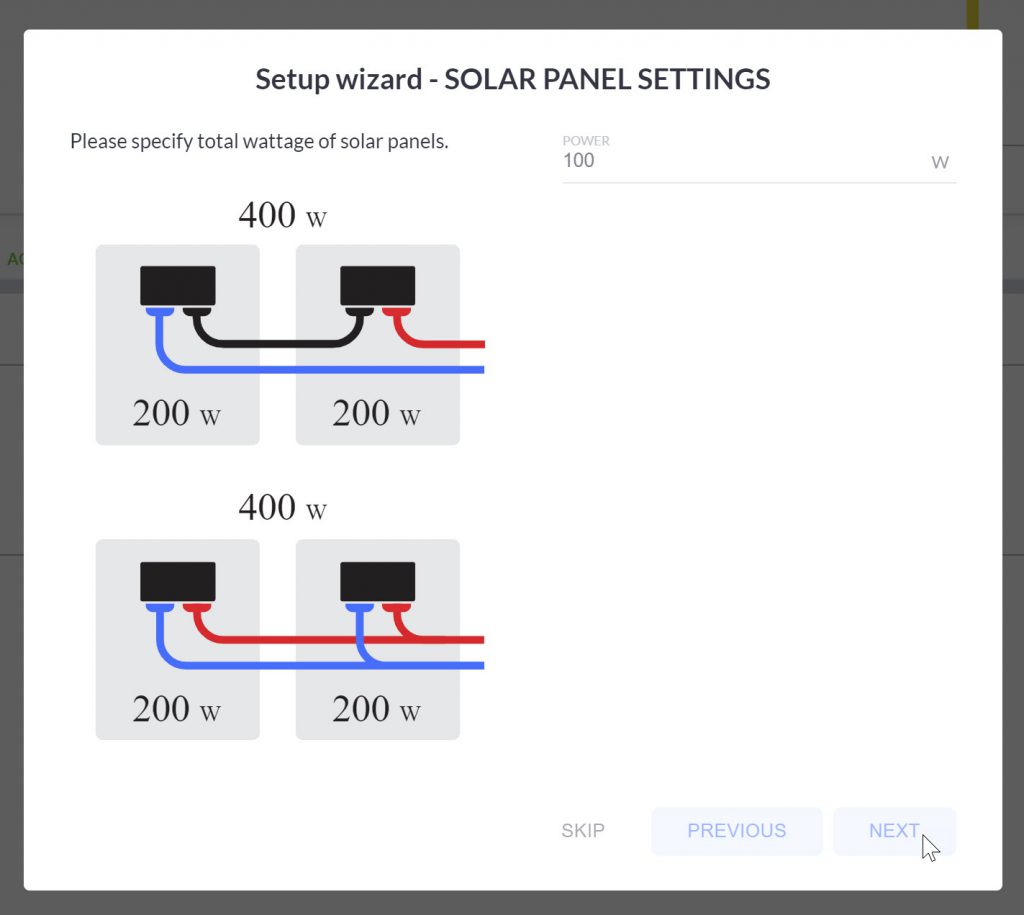
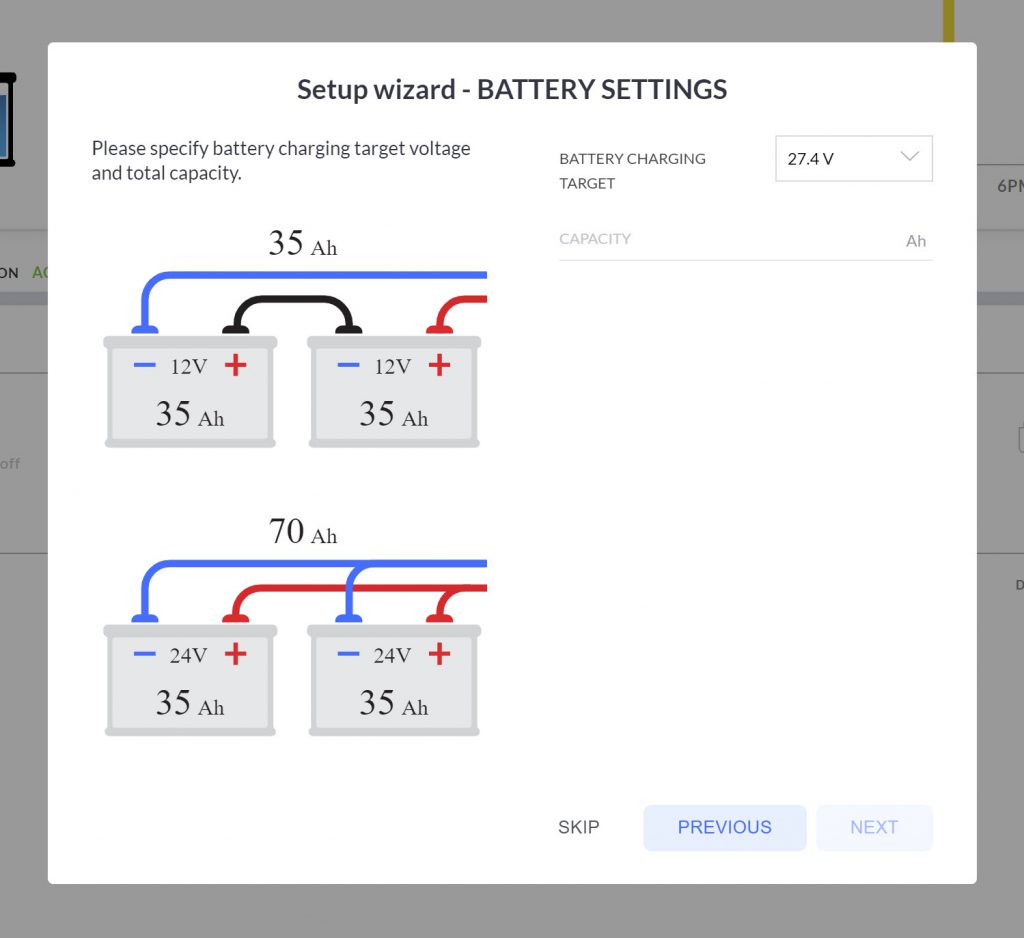
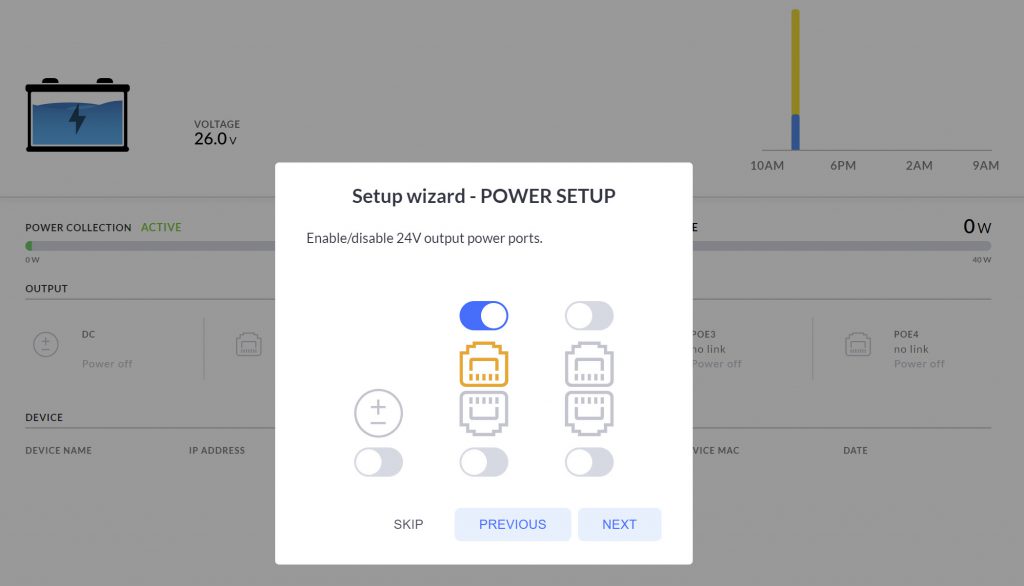
Once you log in to the SolarPoint, either via the management WiFi access point, or via the local IP address, you get the setup wizard. You will have to enter solar panel capacity, battery capacity and enable any PoE ports you want to use.
Once you have filled in the configuration values for the system, the dashboard loads up.
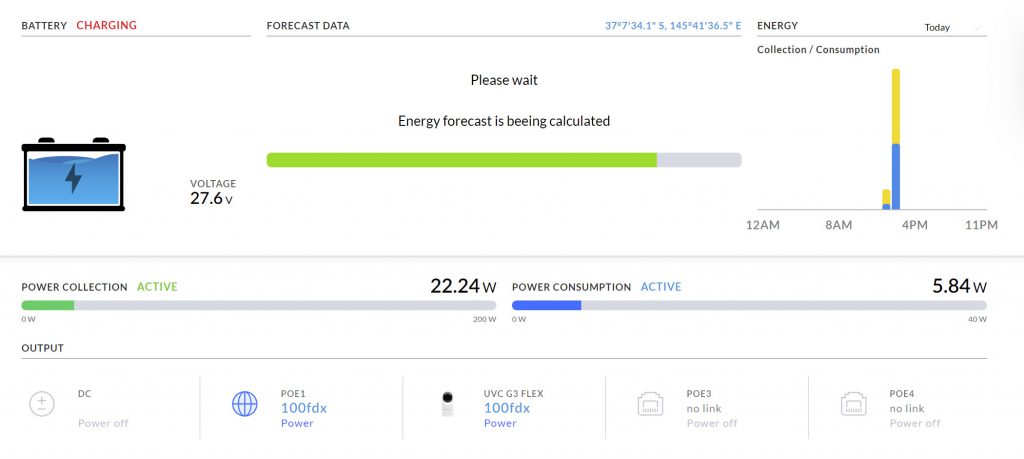
This is an excellent view of current health and state of your battery, the charging and usage. The SolarPoint has a forecast that loads based on your location to give some indication of when you might run out of juice, if at all. However, mostly the forecast wouldn’t load or was not accurate to official local forecasts. I am not sure where the data is coming from 🤔.
Everything is powered and you can even see the current usage of the devices. I like data, and I like looking at all this very much. I am not sure my 100W panel is enough if I hook up another device though, such as an access point.
Parts List
All up, I got some parts from Ubiquiti to review, and some parts I went and bought myself.
[table id=1 /]
You can definitely make this cheaper or different by choosing a different camera, connecting with a cable instead of wireless and a smaller solar panel. Figure out what is right for your setup.
Final Thoughts
It works! I have a camera at my gate that is connected wirelessly to my existing Unifi network through a NanoStation and it is all 100% solar powered. The two random batteries I had lying around works well, but the 25aH one just isn’t big enough. If I have 3-4 days with little sunshine (which is common here in winter), the SolarPoint and attached devices will switch off usually at around 9pm and come back online around 8am. This will only be an issue in winter, but using two 38aH batteries should fix that.
The SolarPoint works really well. It is easy to set up and configure. I do get the sense that it is a product that is being pushed to the back by Ubiquiti. The forecast system is often either not loading or wildly inaccurate. At times it does seem to work but I all too often get “High Risk!” as an alert, when the forecast is all sunshine. I also found a screenshot in a forum post of the SolarPoint working in the UNMS mobile app, but that support has been removed.
If there is a V2 of the SolarPoint, I hope it will have 802,3af PoE to support more devices, and a more loved controller software implementation.
The NanoStations are awesome. I have very little experience with networking equipment, yet I figured out how to set up high speed WiFi over large distances. The signal is incredibly stable and the hardware is non-offensive (as is most Unifi devices). I am already setting up the next remote project using NanoStations as well….