
Wow, this blog is turning into a bit of a Ubiquiti and Unifi journal. However, in the midst of all of the Azure content I am creating, the networking infrastructure on my farm has taken hold of my attention. I never thought I’d be this much into it, but here we are. Again.
With the COVID-19 pandemic forcing many to work from home, I have seen countless social media posts on how to update your home office. Even though I have worked from home for a number of years, I would normally go to the A Cloud Guru office to film my shows. Suddenly I have to shoot all footage from home. On my own. I have a decent camera, decent microphone and okay lighting. However, there is room for improvement. It is time to plan the next step.
https://twitter.com/larsklint/status/1296570058303397888
The Plan
The end goal is to have better lighting primarily for recording video, but also in my office in general. The lighting from the single ceiling light can best be described at anaemic.
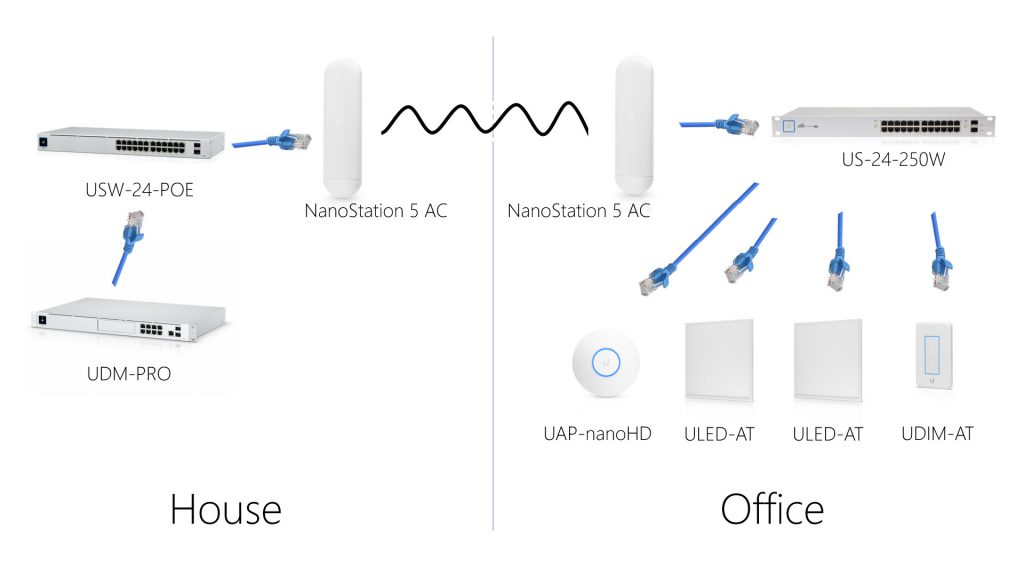
Ubiquiti sent me two LED panels, that are powered by PoE, power over ethernet. Hmmm, I could use those as ceiling lights. However, I will of course need CAT6 cables powering them and for a data signal to control them. Which would mean a switch in the office, a switch connected to my Dream Machine Pro. Only problem is that my office isn’t even in the same building as the UDM-PRO, let alone connected via a wired connection.
So, the plan. It consists of a number of steps, as I’ll take the opportunity to upgrade other parts of my network.
- Upgrade my first gen 24-port 250W switch with the new second generation 24-port switch
- Connect the office with two NanoStations
- Add an indoor access point to the office
- Install a network wall plate in the office
- Install two Unifi LED panels and a dimmer switch
Conceptually, it should look like this at the end.
Switch Upgrade
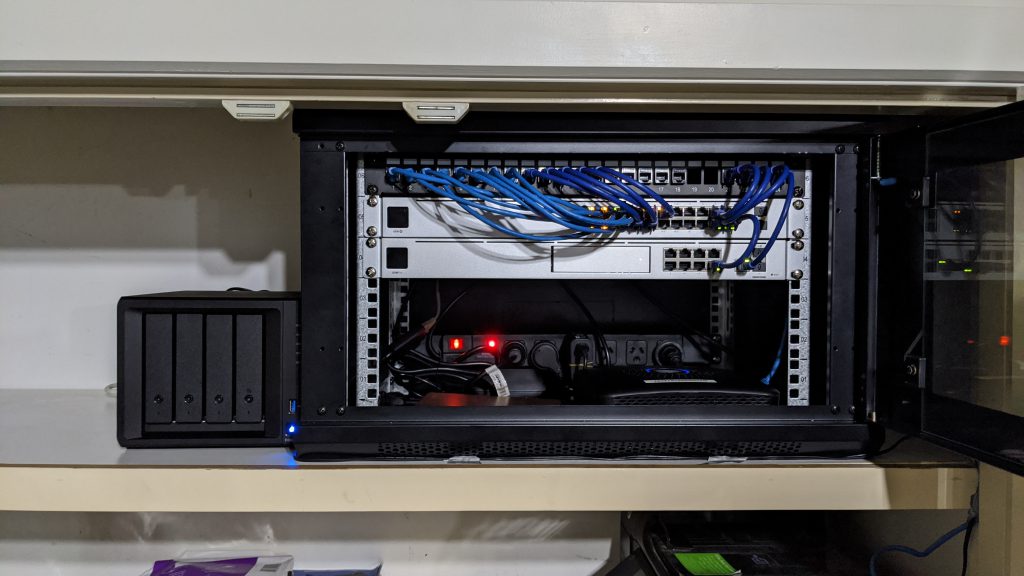
I had, at the start of my farm network upgrade, chosen a cupboard in the house to put my networking hardware in. This included the Internet modem, the 24 port switch, my Synology DS920+ NAS, the Dream Machine Pro, the laptop hosting llamacam, a Raspberry Pi for hosting Home Assistant and more. It was a mess.
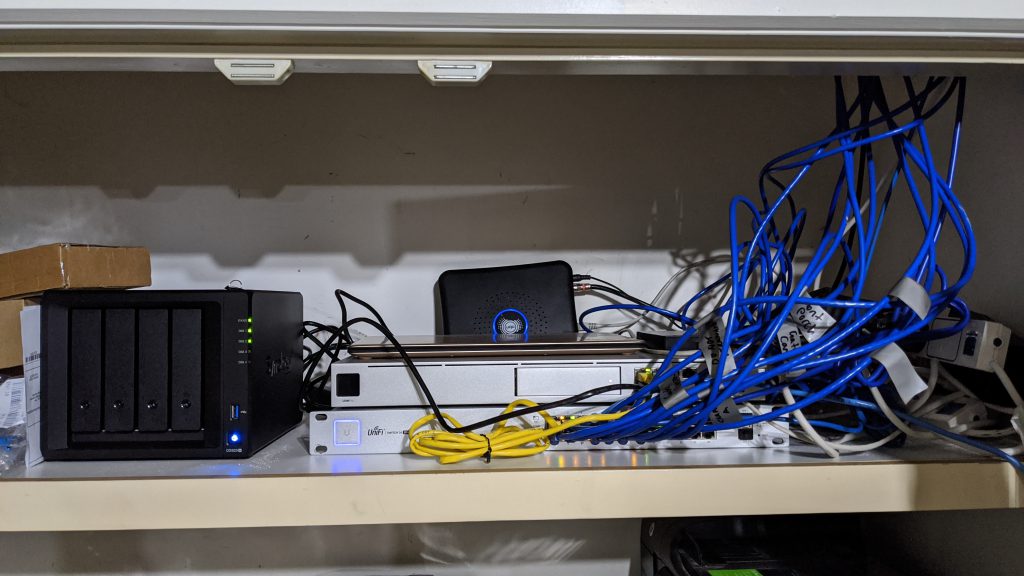
I got a 6RU server cabinet that almost fit on the top shelf of the cupboard (I had to assemble the damn thing in situ), and as I had to move everything into the cabinet, I swapped the switch over. Why did I want to swap one 24-port switch for another you might ask? For three reasons.
- The 24 port 250W PoE switch is loud. The fans are on all the time!
- I needed another switch in my office for powering APs, lights etc.
- Unifi sent me a new second generation 24-port PoE switch.
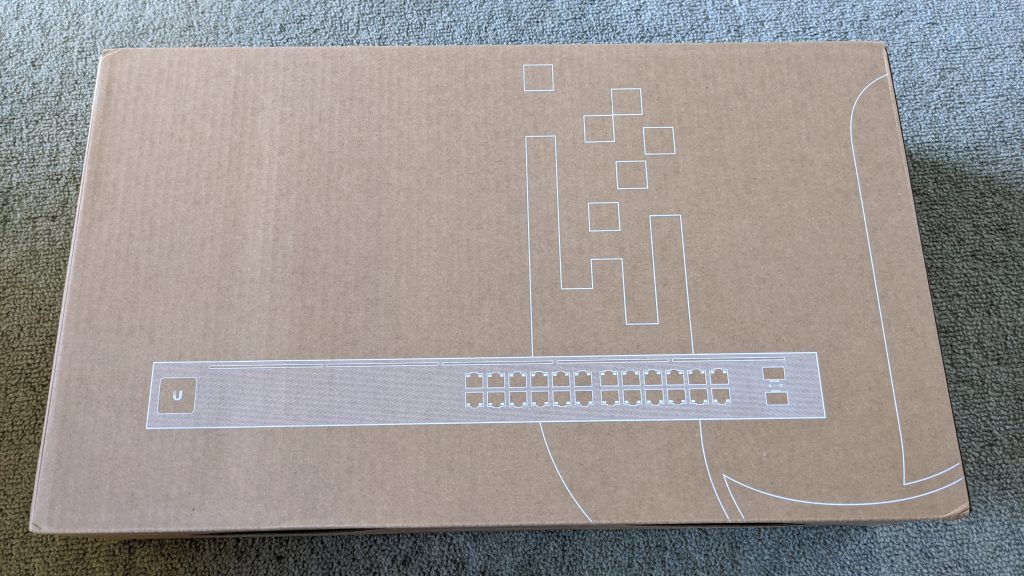
Let’s look at the new switch. I am still a fan of the cardboard coloured packaging for the switching products from Unifi. It makes it look industrial and tough.
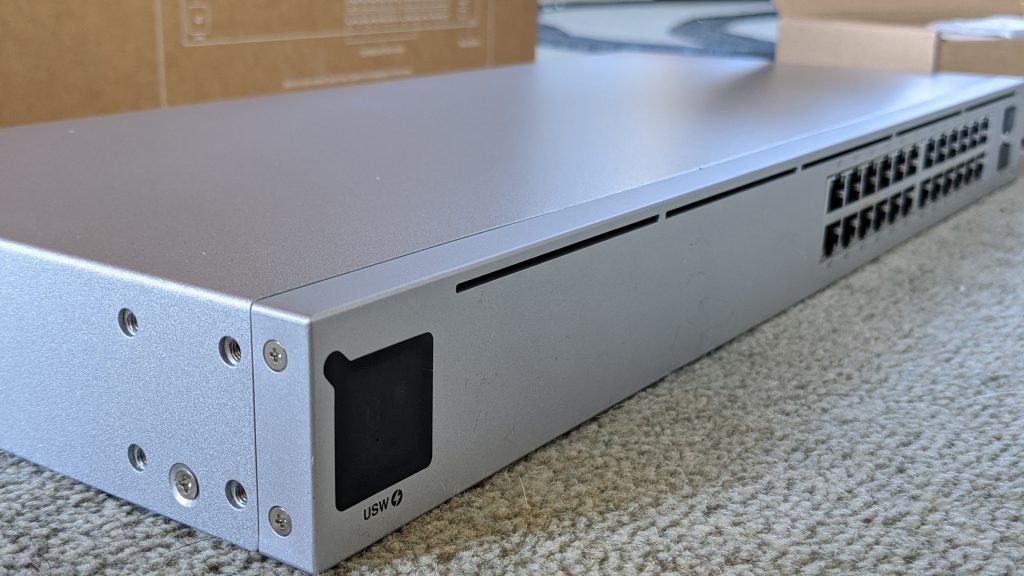
The second generation switch comes with a little LCD display, just like the UDM-PRO does. The build is sturdy and comes in the silver-grey paint that most of the Unifi switching equipment comes in. Once you plug the switch in, the little LCD comes to light and the most noticeable (for me at least) is the…silence. Only having 16 PoE ports out of the 24 has probably meant that the engineers could do away with any fans. This thing just doesn’t make any noise.
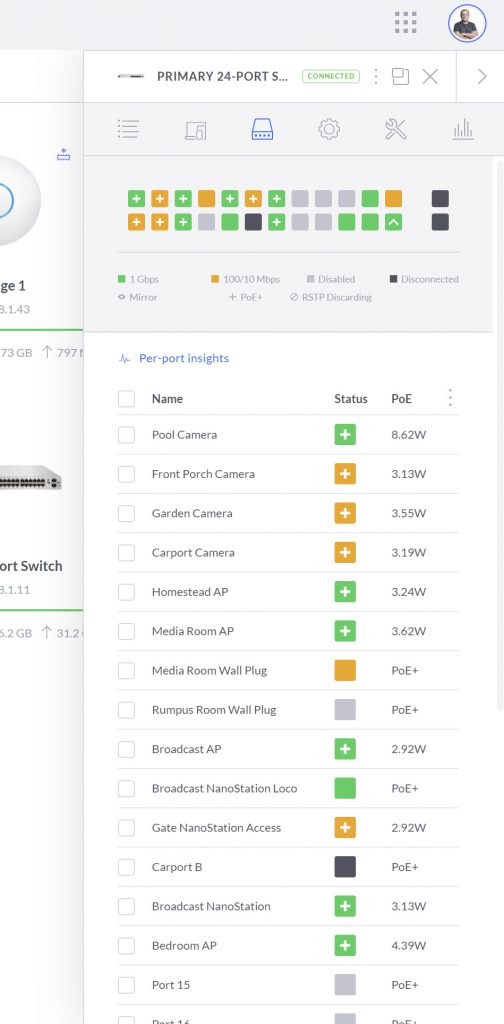
In the Unifi controller software you can rename the ports from port 1, port 2 etc. to whatever you want. I like that a lot, so everything has a place and a name, and I know exactly what is plugged into which port.
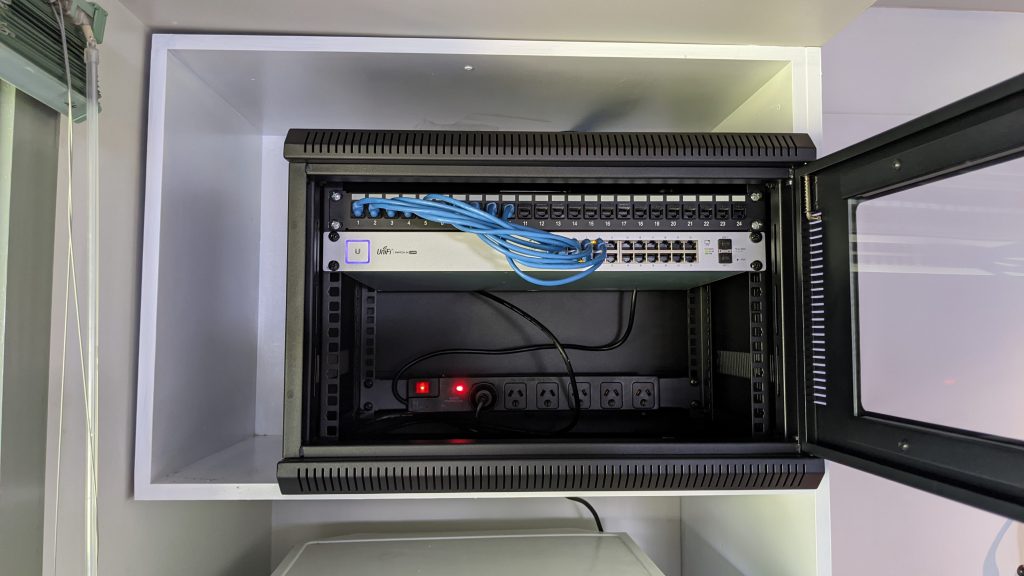
This makes it much simpler to move all the connections across from one switch to another and know what they are. And then I finally got all my cable spaghetti sorted and neatened up. This makes my OCD very happy. From the top there is a 24 port patch panel, the UniFi Switch 24 PoE, the Dream Machine Pro, a rack mounted powerboard, and the llamacam laptop lying on the bottom of the cabinet. I did get a rackmount shelf for it later on.
The Office Wireless Wired Connection
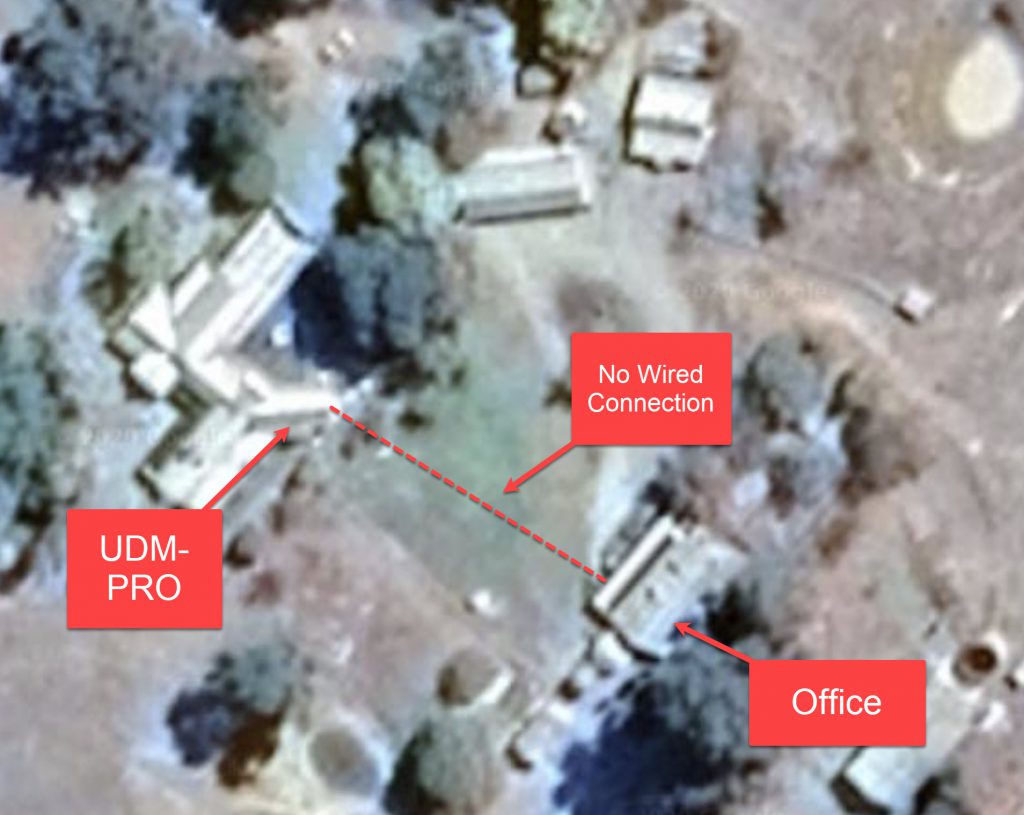
Next step in my grand plan was to get a stable high speed connection to the office. The distance from the Dream Machine Pro is only about 45 meters, but it is uphill, it is through fences and a garden. And I don’t like digging. I have talked to numerous network nerds that all swear by digging and laying cable. There is an easier way in my opinion: NanoStations.
I have used them before to get a stable signal to the llamacam, and they work a treat. The range can be up to 15km apparently, but I need roughly 45 meters 🤷♂️. It still beats digging, despite the apparent overkill. The NanoStation 5AC that I got a pair of, have different configuration options. You can use point to point (PtP), which is a one-to-one setup. One access point (where the signal comes from) and one station (where the signal goes to). You can use point to multipoint (PtMP), which has a single access point, but multiple stations. Kind of a broadcast mode.
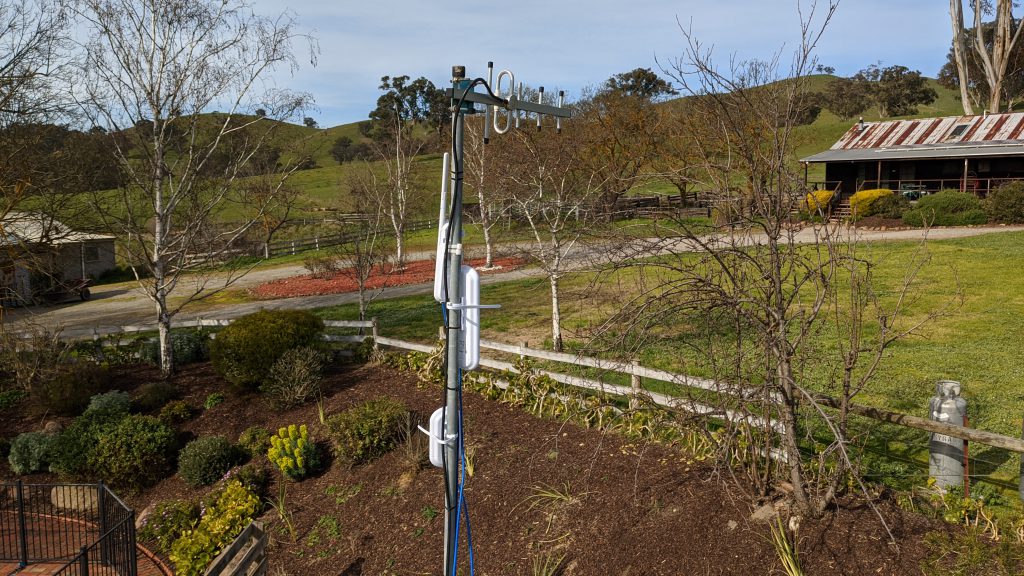
As you can see from the photo, the number of NanoStations is growing, so I thought I’d try and set up a PtMP connection to the office and the pump shed. Long story short, I don’t understand it fully and I messed everything up. I ended up having to hard reset several of the NanoStations to fix it. For now I am sticking with PtP setups. Powering the NanoStations is PoE, which means more cabling from the switch. I am getting good at this “running-cables-through-parts-of-the-house-I-didn’t-know-excisted” business.
As you can see from the photo, I do run a lot of CAT6 cable as well, as it definitely gives the best experience, no doubt. However, the NanoStation units fit in beautifully with my overall goals of connectivity. In this case from the main house (which I am standing on top of in that photo) to the office, which is the building in the top right. I went through the setup before, so won’t do it here, but once you have the two stations connected, you get a nice dashboard with all the live metrics.
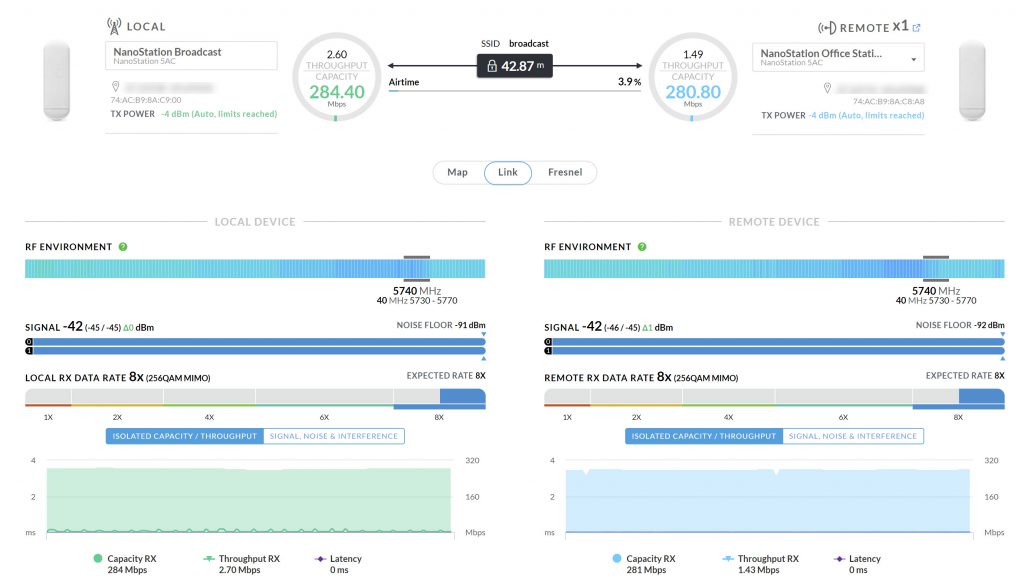
And the connection behaves as a wired connection in the Unifi eco-system. You get the same IP address range from your DHCP server, anything connected with CAT6 on the other end shows up as wired, and the throughput capacity is super stable at about 300 Mpbs.
Office Access Point – Nano Style
Up until this point I have been using a FlexHD access point mounted to the outside of the office. It worked reasonably, but I noticed that at times my devices would jump between that access point and another outdoor mesh AP. I think this caused video calls to buffer occasionally, and in any case I wanted an indoor AP for the office. First step was to re-purpose the first gen 24-port switch from earlier. This would form the main connection point for everything in the office.
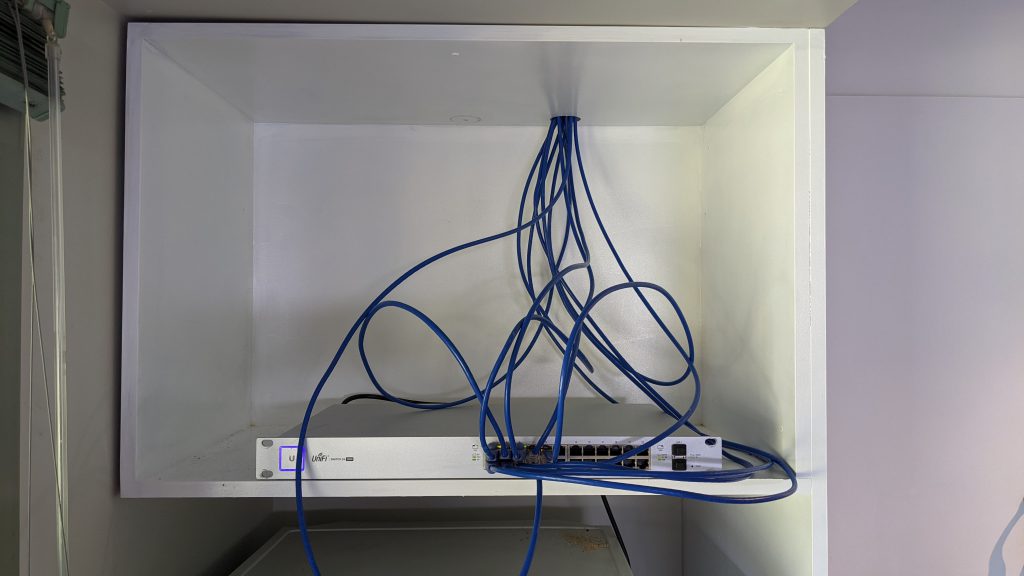
Yes, I am aware of the cable mess. I’ll get to that later. But all of those cables go into the roof space, and that is where I connect everything, starting with a new shiny nanoHD access point. This is a small form factor, very powerful device. Or as Unifi puts it: “The UniFi nanoHD is a compact 4×4 MU-MIMO 802.11ac Wave 2 dual-band access point with an aggregate radio rate of over 2 Gbps and supports over 200 concurrent users. ” That ought to do it. Not much more to it, as the Unifi access points are so easy to install and adopt into the Unifi controller.
Wall Plates and Drilling
It isn’t that exciting, but I finally got a proper wall plate with an RJ45 connection in my office. I connect my docking station to it, so I get a wired connection when I’m using my laptop. It did require more drilling in my walls and ceiling, which I am still not 100% okay with. I always doubt if I am drilling in the right place 🤷♂️.
As old school and corporate as it feels to put network connection plugs in the wall, it is still the best way to get a stable connection. Small point to this story, but it made me happy 😁
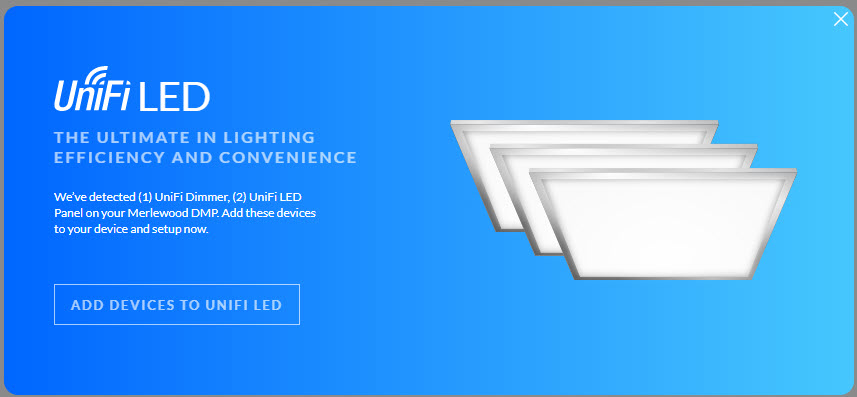
Dimmable LED Skylights
And that gets us to the end goal of actually installing the LED panels. I have to admit, I had no idea how they would work or where to exactly put them. The Unifi LED panels are meant for a suspended ceiling in an office space, which is why they are exactly 2 feet squared. They just fit….if you have a suspended office ceiling. Which I don’t.
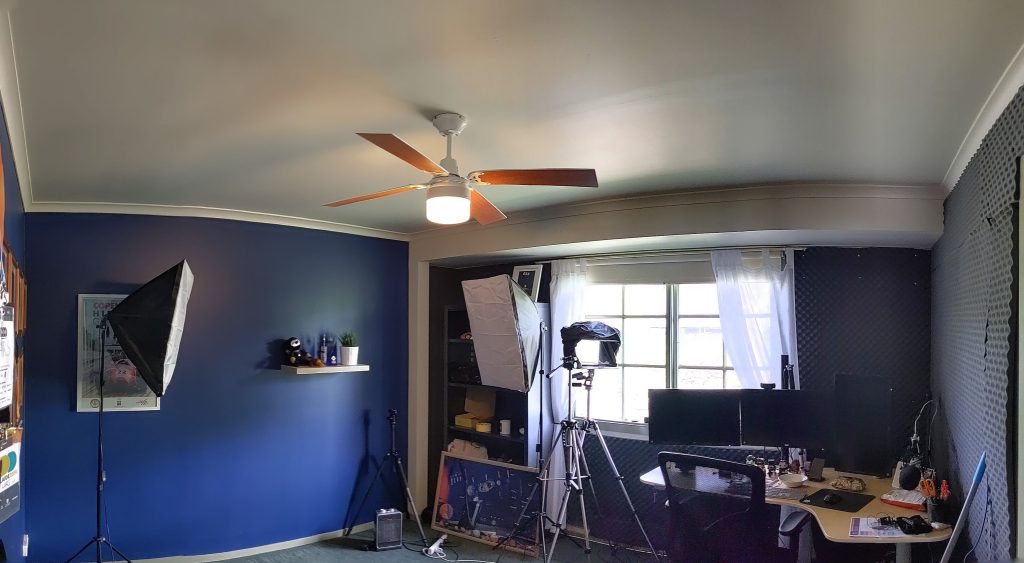
As I mentioned at the start, the two main reasons for putting the lights up in the first place are better general office lighting and much better lighting for recording my shows. Here is a screengrab from before the lights went up.

The lighting isn’t terrible, but a bit harsh on the face to make up for the lack of room lighting.
My first hurdle was figuring out how to mount them and where. I settled on a spot with the two lights side by side, which would give good room light, and also allow me to stand in several different places for recording with different backgrounds. I did have to move the ceiling fan to make room.
Mounting them was harder. Because the panels are meant to “just drop in”, there are no mounting points nor brackets that come with them. I ended up finding some aluminium rails that would fit when cut to size. I could then make 4 brackets, 2 for each panel, and attach the brackets with bolts, washers and nuts.
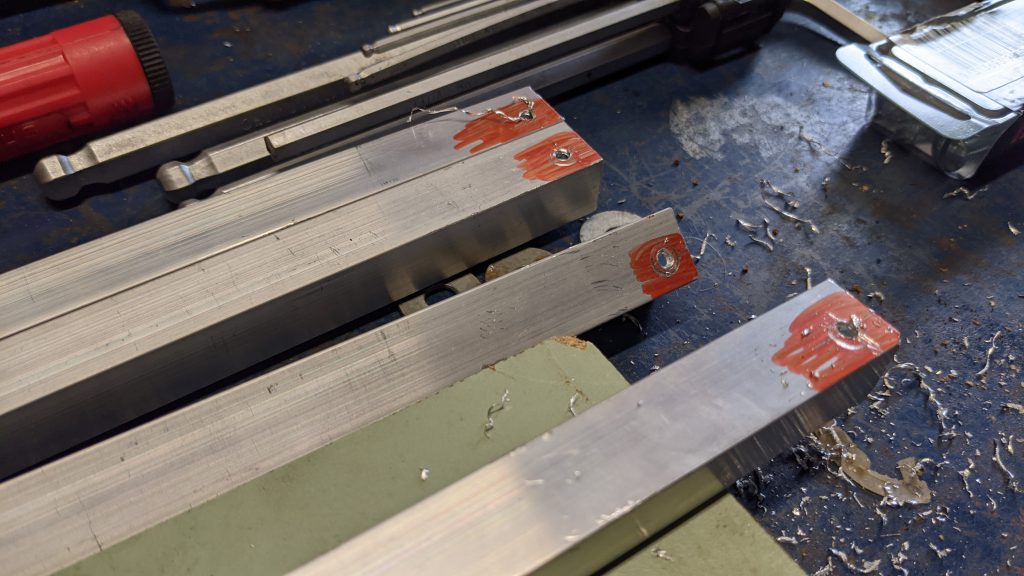
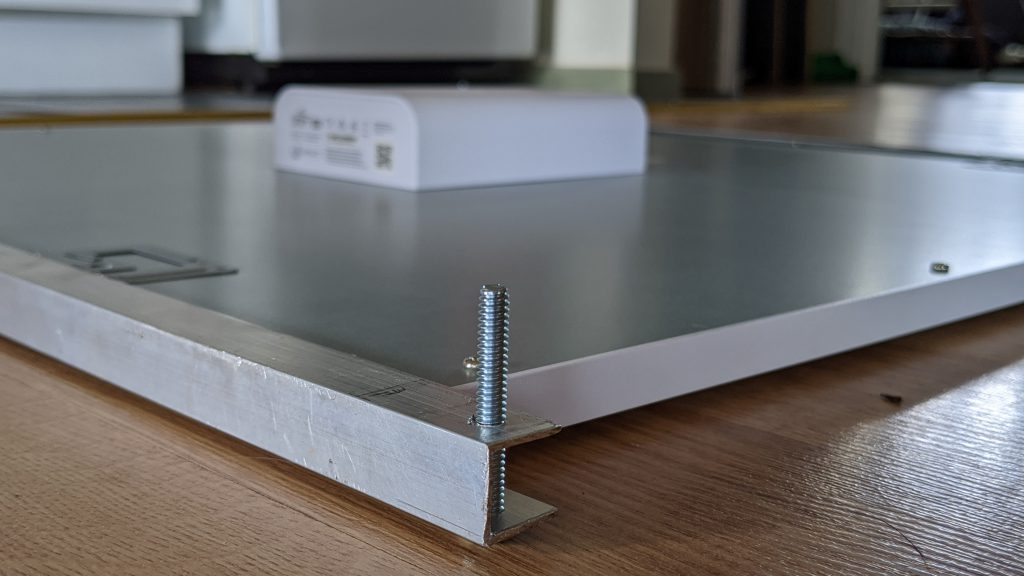
The panels fit snug, but not too tight in the rails, and I could then push those bolts through the soft plaster ceiling and attach. There were quite a bit of measuring to make sure I didn’t hit the beams though. The protruding power brick on the panel needed a hole in the ceiling and wouldn’t fit into a beam.
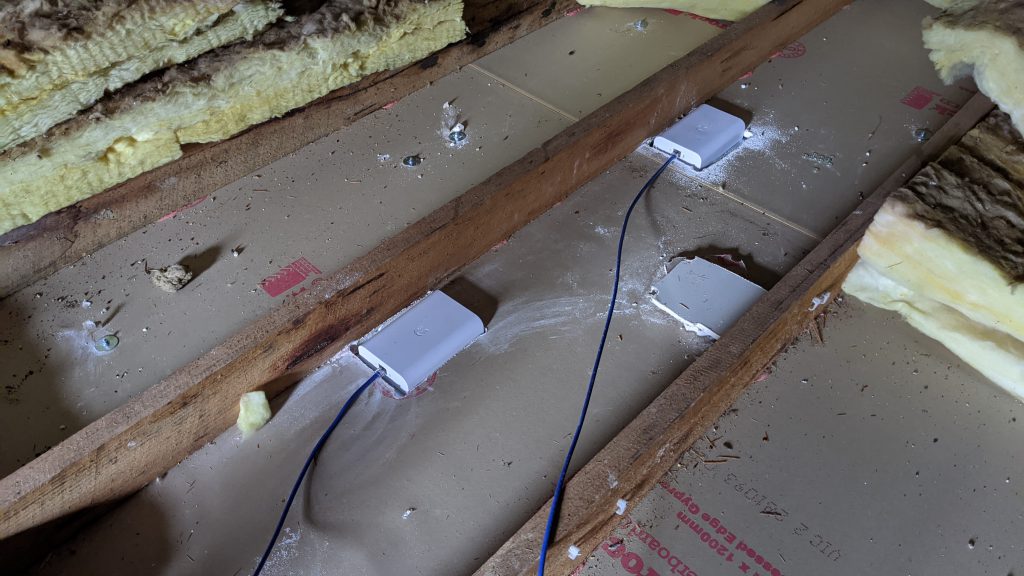
I then hooked it all up to my 24-port switch, along with the dimmer, and it just worked. Using PoE is just so nice and safe. Cables just click in and the switch does the rest. I first used the Unifi LED app to use the lights and dimmer. They all send out a Bluetooth signal, so the app knows when you are close to the lights and you can then control them. I should mention you can also use AC power to get them going.
Finally done! I now have LED skylights which gives a very nice light, but is also excellent for "filler light" when recording 📽️🎤💡 pic.twitter.com/dOQ798ZkiG
— Lars Klint | 🚜🥑📹 (@larsklint) October 18, 2020
You might think the story ends here, but no. I wasn’t happy with the App experience, and I really want to control the lights with Home Assistant too, so was looking at using the LED controller. However, I could only find a Linux installer, and I don’t have a Linux machine. Bugger. I considered running it inside a container on an old laptop and other scenarios, when I happened to do a maintenance check on my UDM-Pro, and lo and behold…
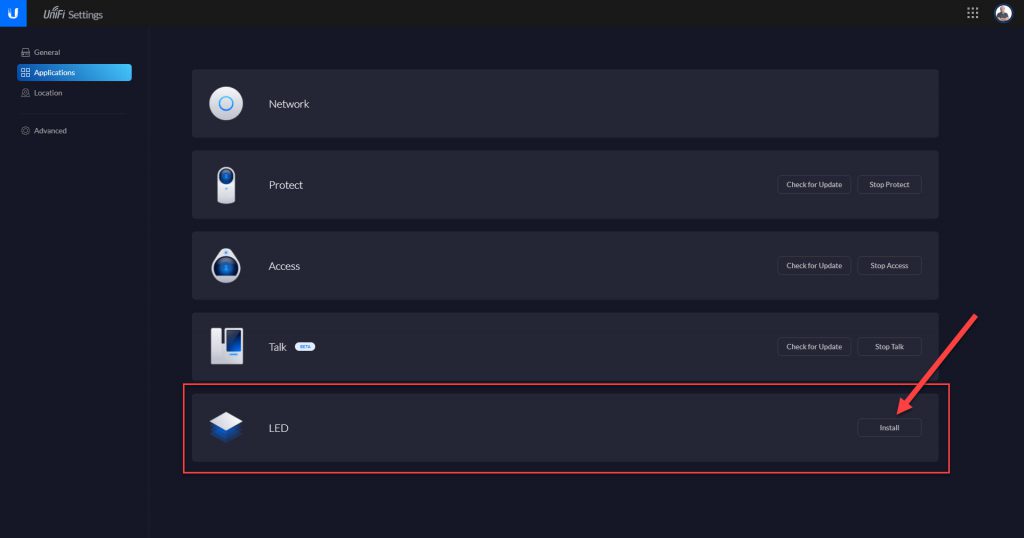
The controller for the LEDs just appeared. It must be when it detects the panels or something. Whatever works! I installed the controller which immediately found my devices.
I adopted them in the normal Unifi way and voila, I have lights inside my LED controller, inside my UDM-Pro. Very organised.

The controller also comes with a nice energy consumption dashboard. This will show cost estimates and how much, or how little, power you are using.
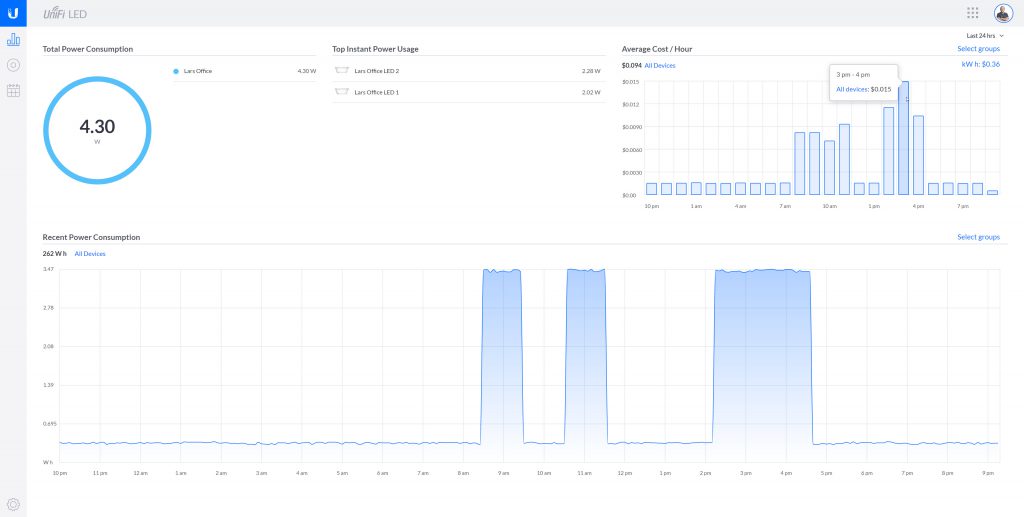
There’s also a scheduling section, so you can have lights come on and turn off automatically or with motion events. I haven’t explored that part yet though.
Final Thoughts
That was a really long way of getting some more lights in my office. However, I did sort out a lot little things on the way, and I improved the infrastructure on my farm. That fan-less USW-24-POE switch is brilliant. It produces less heat and less noise, and the little LCD just makes it more…shiny?
I still swear by the NanoStations rather than digging, even though I can’t figure out how to use PtMP. The connection is super stable and once they are running, I just don’t touch them. They continue to work with no outages at all (except for when I fiddle with them).
And of course the lights, which is why we’re here. They have exceeded my expectations. They weren’t meant to go into my ceiling and the installation was very bespoke, but it worked! The fact they are dimmable means I can adjust the light perfectly when recording, and I can control them through the UDM-Pro as well. So what did it end up looking like?

And my video editor agrees too.

I am stoked! Oh, and I did fix the cable mess in the office too.